

Showing posts with label Household Hint. Show all posts
Showing posts with label Household Hint. Show all posts
Friday, May 11, 2012

Friday, September 23, 2011
Household Hint
On a previous post by Jen, a reader left a comment wondering how to get permanent marker off of pine. I have a very bad relationship with permanent markers. My oldest colored on a leather chair, there was no getting it off of that. Then my baby colored on a wood cabinet, it was almost brand new still.
I think wood is the hardest thing to get stuff off of. Depending on the finish you don't want to ruin the whole thing with your cleaner. Before you try and tackle any stain, test a small inconspicuous area first to see how the item will react.
Here are a few things I have used or heard to try to remove permanent marker off wood:
Hair Spray and Cotton Balls (Vinegar and Water after will make it not be sticky)
Rubbing Alcohol and Cotton Balls
Mr. Clean Magic Eraser (My favorite around the house!)
Colgate Toothpaste (I am trying this as soon as I get to the store!)
Finger Nail Polish Remover

I think wood is the hardest thing to get stuff off of. Depending on the finish you don't want to ruin the whole thing with your cleaner. Before you try and tackle any stain, test a small inconspicuous area first to see how the item will react.
Here are a few things I have used or heard to try to remove permanent marker off wood:
Hair Spray and Cotton Balls (Vinegar and Water after will make it not be sticky)
Rubbing Alcohol and Cotton Balls
Mr. Clean Magic Eraser (My favorite around the house!)
Colgate Toothpaste (I am trying this as soon as I get to the store!)
Finger Nail Polish Remover
Friday, September 9, 2011
Household Hint
The other day I was reading a recipe book, I can't remember which one it was now, but it had the best idea. I'm sure a lot of people have thought of this but it was pure genius to me! When you are browning hamburger and need to drain the excess grease do not pour it down the drain. This is obvious. I am often left looking for somewhere to put it. I hate pouring it in a mug because it is so gross to clean out. The book said to line a mug with foil before you pour in the grease. After the grease has cooled and solidified pull the foil out with the grease blob. The mug will be so much easier to clean and you won't clog your pipes!
Monday, August 8, 2011
Household Hint
You'd think that I would get used to the high cost of berries at the grocery store, but every time I buy raspberries it kind of makes me mad. Really, four dollars for such a small container? What makes me ever more mad is that you almost have to use them immediately. It irks me when I purchase berries and within days that have already started to mold! I was on Facebook and found this tip. I with that I would have bookmarked it to give the person credit, but I didn't even think about it
Wash any kind of berry in a vinegar and water solution. You can use plain old white vinegar or cider vinegar. Use one part vinegar to ten parts water. The vinegar will kill the mold causing germs on the berries extending their life. You can mix it up in a bowl and put the berries in that or spray it on. I feel like the vinegar taste is not strong enough to worry about rinsing off, but you totally can.
Remember to store the washed berries in the refrigerator to help extend their life even more.
Wash any kind of berry in a vinegar and water solution. You can use plain old white vinegar or cider vinegar. Use one part vinegar to ten parts water. The vinegar will kill the mold causing germs on the berries extending their life. You can mix it up in a bowl and put the berries in that or spray it on. I feel like the vinegar taste is not strong enough to worry about rinsing off, but you totally can.
Remember to store the washed berries in the refrigerator to help extend their life even more.
Friday, July 22, 2011
Household Hint
My husbands family owns a farm in Green River, Utah. It’s not a farm in the sense of cows, horses, chickens etc., they grow pumpkins and the ever famous Green River Melons. One of my favorite things to do in September is to go to the farm once the fields have all been harvested and bust open the remaining watermelons to eat the hearts out and leave the rest. Once a field is harvested for the last time in the season, there are still so many melons leftover, especially cantaloupe. It is just fun to eat the best part and move on until you’re full!
Here are some helpful hints that will guide you in the right direction when choosing a watermelon this summer:
· The best time to buy a watermelon is towards the middle of August and into September. They’ll also less expensive at this time
· A watermelon should sound hollow when you tap on it.
· It should be heavy. When you pick it up you should think, “There is no way something this size should weigh this much.”
· A yellow spot on the rind means it is ripe.
· The brown scabs on the rind mean it is sweet.

Friday, July 15, 2011
Household Hint
I have to preface this post:
Erica and her husband invited my little family over to dinner at their house a few months ago. They talked about a project they are working on in their bedroom and took us to see it. Mike is an amazing artist and was in the process of painting a beautiful tree on their wall. I have seen many trees on different blogs but that have been done in vinyl. I love the custom hand painted job he was doing. It is truly amazing and I can’t wait until their whole room is done and ready for her reveal.
After seeing her tree I was green with envy. It is Uh May Zing! Both my husband and I lack the artistic abilities to create one of our own and for the size of a vinyl tree that I wanted would have been over $100! I was almost willing to pay. Luckily my next door neighbor just purchased a graphic for her vinyl cutter that was all about trees! We were both so excited to try it out. I quickly drove to our vinyl supplier, purchased the vinyl and well, you’ll see the end result!
 |
| Isn't this so true? It makes me smile when I read it. I cut this saying out using my Cricut. |
I love my laundry room! Seriously. It is one of my favorite rooms in our home right now. Not so much that I invite guests to sit and visit in there, but just enough that when I need to do laundry I don’t dread going in. I think that it is important to have something fun and upbeat for each of our household chores. Having a clean, well organized and aesthetically pleasing area is the positive I need to get laundry done. Now if I can just figure out how to turn doing dishes into something fun!
 |
| I love this tree! It makes the laundry room feel "fun". It is a little over seven feet tall. |
Although there are only four in our family I can do two loads of laundry just about every day. In each bedroom we have dirty clothes baskets, but in the laundry room there are five: whites, colors, jeans, towels and cleaners. When the baskets in the bedrooms start to get full or the kids are out of clean underwear, we sort into the baskets in the laundry room. I like doing this because I can see when I need to do a load and it keeps the clothes off the floor. If you are short on space there are great divided baskets like these that fit easily in a closet.
 |
| I used my Cricut again to cut labels for the laundry baskets. This way the whole family knows where to put their clothes. |

Another thing is that I like to have the laundry soap out and easily accessible. My friend keeps hers in a pretty open bowl with “Soap” written in vinyl across the front. I found my glass cookie jar at Wal-Mart for thirteen dollars. I like that it has a lid. It rattled a lot when the dryer was on so I used a Silly Putty type product on the lid to cushion it. Now it doesn’t make a sound. There is also a cute metal decorative box I found at Hobby Lobby that sits next to the soap. I use it for spare change and the occasional dollar that comes through the wash. This is our go to box when we hear the ice cream man. I make sure and put any spare change I have in it all year just so I know there will always be a couple dollars when we hear the music! It has made for a couple happy kids plenty of times this summer.
 |
| The kids haven't quite caught on to where the money comes for ice cream, so the box hasn't been emptied yet. Maybe one day! |
The rest of the laundry room is just that. It’s nothing fancy, but I love it! It doesn’t always look this clean. Stuff gets dumped in there to be dealt with later on a regular basis. Sometimes said stuff sits for weeks before anyone deals with it. You know what? I don’t care. I have two amazing kids who want to play and the other stuff will be there when we’re done!
 |
| I don't like a lot of clutter on countertops, but this bucket was perfect for cat food. |
Monday, July 4, 2011
Household Hint
 |
| Image found here. |

My kids are so excited for fireworks. In Utah it is finally legal to light fireworks that go 150 feet in the air. My husband is excited for this! No more fountain works for us! Our son is most excited for smoke bombs and sparklers, and he can't wait to write his name in the air with the sparkler. Our daughter just wants it all! Typical girl!
Here are two tips to make sparklers a little easier:
First, use a jar candle like this. It's best if the candle is about half used. You can also put a votive type candle in a mason jar. The jar will help protect the flame from small gusts of wind. The kids can come stick the sparkler in the flame and light their own sparklers. This way mom and dad aren't trying to keep a pilot sparkler lit and you don't have to wait forever for a match or lighter to light the sparkler.
The next idea is to have a bucket of water handy. If your kids are like mine they just drop the hot sparkler where ever they are and come get a new one. When we have a designated spot for the hot sticks to go, I don't worry as much about burns. Put water in the bucket so the plastic doesn't melt. I like to cut the top off a milk jug, put water in the bottom, throw the used sticks in and then throw the whole thing away at the end of the night.
Happy Fourth of July everyone!
Friday, June 24, 2011
Household Hint
I have self diagnosed OCD. I load the dishwasher the same way every time. I have the same routine at bed every night. I will change the toilet paper if it’s on “backwards”. While I’m not good at staying on top of organization, I have a set way of how I do things. It’s bad. My poor family.

On top of my household quirks, I also had the terrible habit of living vicariously through my children. I’m in recovery now. If there was a toy that reminded my of my own childhood, I bought it. If there was a toy I always wanted as a kid but never had, I bought it. If there was a toy from our favorite stories, I bought it. If a neighbor had a cool toy, well you get the point, I bought it. I’m not one to hold onto things. I probably throw/give more away than I should. When it comes to toys, I’m the opposite. I feel like if the kids have two or three of the same type of toy, there won’t be fights when friends come to play. I also keep the toys they have outgrown. What if my friends bring their little ones over? I need something around for them to play with that they won’t choke on. Yes, I’m a toy hoarder and I can justify just about every toy in the toy room. Maybe I’m not in recovery like previously stated.
I had to do something to keep my sanity. If I can’t get rid of the toys, I need them organized; everything needs a place to be put away. I have a friend who is an obsessive labeler. I LOVE IT! I have not purchase my own label machine yet and it’s probably for the best for everyone. I borrowed a label machine, and went to work on the kids’ playroom. Honestly, it was embarrassing seeing how many ‘things’ they have, and it also made me sick to think of the money wasted.

I started by purchasing clear plastic boxes. Mostly, the shoe box size. Some were a little larger to fit the bigger sized items. I chose clear so they could easily see what was in each box while it was on the shelf. I divided the toys into the boxes. Barbie’s went in one box, tools in another, Mr. Potato Head in a third and so on. Originally I just printed a label and stuck it on the box. But my kids couldn’t read. Eventually the My Little Ponies were in the Thomas box; enter the OCD. I decided to take a few toys from every box and take a picture. I taped the picture under the label. This way they can see what should go in each box once it has been emptied. This also helps when friends come over. They can see that the toys don’t just get put anywhere. It also makes play time easier. The kids are not left searching for all the items. Trains and tracks are kept together; babies and bottles are easily accessible.

My mom had purchased some great cupboards that she no longer needed, so I took two of them. My son and daughter each have their own, separate, toy cupboard. Now if I could just convince myself that if it doesn’t fit in the cupboard they don’t need it!
What are you tricks for keeping your kids things organized?
Friday, June 17, 2011
Household Hint
Have you ever had an "Oh Duh!" moment? I'm embarrassed to admit mine. However, it did serve a purpose, I've got a new household hint!
Do you know when the best day to clean out your refrigerator and freezer is? The day before garbage day. I did the day of, after the truck had been by to empty the garbage. The old food sat out in the can under the sun for a week. It smelled awful. Also, for whatever reason, our fridge was full of junk, it nearly filled half the can!
Do you know when the best day to clean out your refrigerator and freezer is? The day before garbage day. I did the day of, after the truck had been by to empty the garbage. The old food sat out in the can under the sun for a week. It smelled awful. Also, for whatever reason, our fridge was full of junk, it nearly filled half the can!
Friday, June 10, 2011
Fathers Week: Household Hint Sprinkler Drip Line
Here's the thing, my dad has taught me so many things about fixing stuff. Every time I do something that is typically a "mans job", I call and tell him. It impresses us both. My husband also really likes it; it makes his life a lot easier. It helps that I really like doing it too. You get such a sense of self reliance, it's amazing.
I have helped install a few sprinkler systems. I don't know how to do the valve work or connect to the main water line yet, but I can lay pipe and attach the sprinklers. It really isn't hard. Last Spring I caught the gardening bug. I decided to pull out a ton of grass in the front yard and make a bush bed (I don't do flowers). I also decided that the best way to get water to the bushes would be a drip line. That way I didn't have to worry about the plants getting too large and blocking the water. My neighbor up the street had just done one herself, so she pointed me in the right direction. With our new home, we're totally starting over. We have grass in the front yard and nothing else. There were three beds that needed immediate attention before the weeds overtook them completely. I installed another drip line and planted more bushes.
First, you have to know that it is so, so, so easy! It's only intimidating if you have no idea of where to start. Let me point you in the right direction. Keep in mind, I can only help once you have a main sprinkler system with water. I'll show you how to tap into it and what to do once you're there. My links will all be to the Home Depot. No, they are not paying me, they should, but they're not. That's where I shop so that's where I'll link. Also, I know that this method is not the only way. However, it's the easiest way I know. Here we go!
What you need:
1/2 Inch PVC x Compression Coupling
1/2 Inch Poly TubePoly Tube (Measure the length of your flower bed to determine how much tubing to buy)
1/2 Inch End Cap
1/4 Inch Microtube (This is sold in rolls of 50 and 100 feet. I've always been fine with 50.)
For the following you'll need one of each for EVERY plant (These are sold in bags of 5, 10, and 25):
1/4 Inch Barb Connector
Button Dripper
Stabilizer Stake
Depending on your sprinkler system you may also need a small cut of 1/2 Inch PVC Pipe and a 1/2 Inch PVC Elbow.


I have helped install a few sprinkler systems. I don't know how to do the valve work or connect to the main water line yet, but I can lay pipe and attach the sprinklers. It really isn't hard. Last Spring I caught the gardening bug. I decided to pull out a ton of grass in the front yard and make a bush bed (I don't do flowers). I also decided that the best way to get water to the bushes would be a drip line. That way I didn't have to worry about the plants getting too large and blocking the water. My neighbor up the street had just done one herself, so she pointed me in the right direction. With our new home, we're totally starting over. We have grass in the front yard and nothing else. There were three beds that needed immediate attention before the weeds overtook them completely. I installed another drip line and planted more bushes.
What you need:
1/2 Inch PVC x Compression Coupling
1/2 Inch Poly TubePoly Tube (Measure the length of your flower bed to determine how much tubing to buy)
1/2 Inch End Cap
1/4 Inch Microtube (This is sold in rolls of 50 and 100 feet. I've always been fine with 50.)
For the following you'll need one of each for EVERY plant (These are sold in bags of 5, 10, and 25):
1/4 Inch Barb Connector
Button Dripper
Stabilizer Stake
Depending on your sprinkler system you may also need a small cut of 1/2 Inch PVC Pipe and a 1/2 Inch PVC Elbow.
*WARNING! You will get dirty!*

This is how it started for me. I had a 1/2 inch piece of PVC sticking up out of the ground. Very pretty I know. It was connected to the main sprinkler system. It did have an end cap so I didn't have a fountain. I dug down a little so my fittings would be covered and then I cut the pipe off.

When working with PVC you must have both of these. Purple primer goes on first. Apply it where your PVC pieces meet. Allow it to dry for several seconds. Then brush the PVC cement on. Both of these have a built in brush attached to the lid on the inside. Hold the pieces you are gluing together while the cement dries for several seconds. Be careful to not get these on your hands, since they're hard to get off.
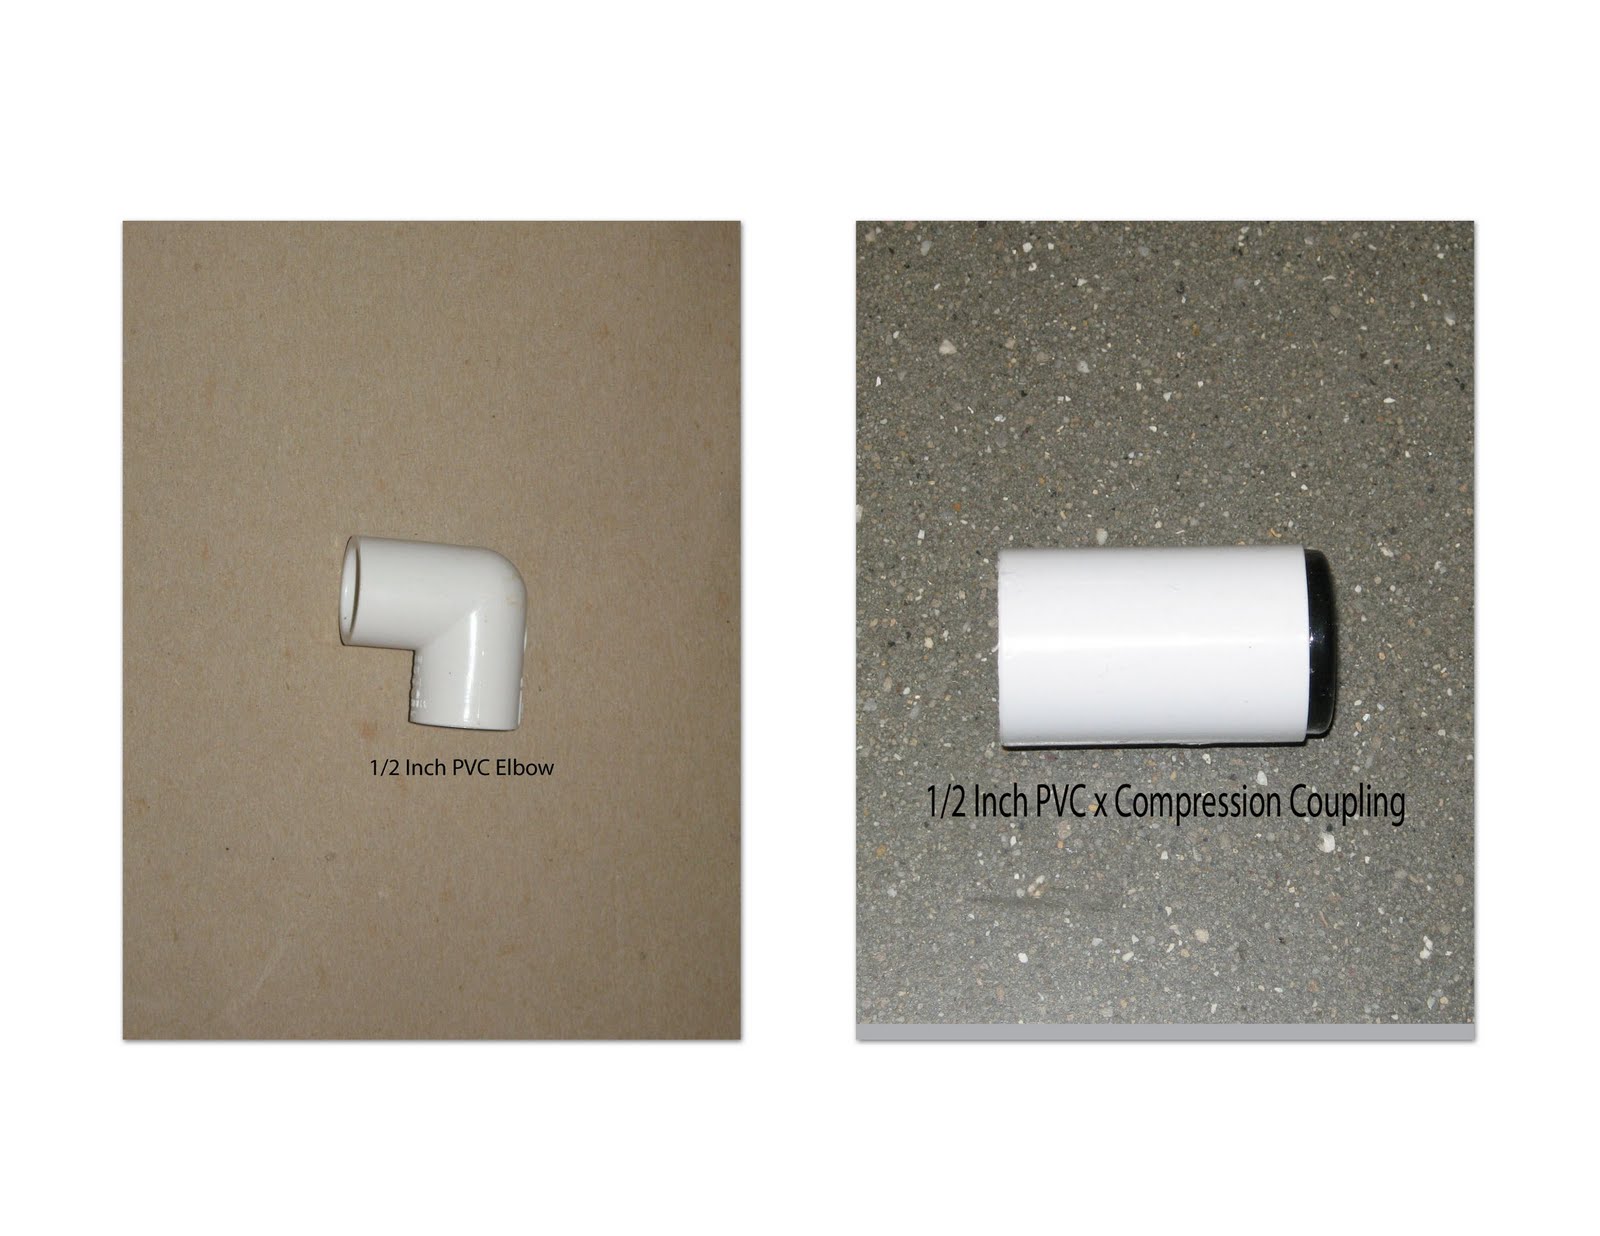

I primed the inside of the 1/2 inch elbow and glued it to the piece of 1/2 inch pipe I had cut. I then used about a 3 inch section of the pipe and primed and glued it to the other end of the elbow. Next, I primed and glued the compression coupling to the pipe. The black end of the compression coupling is where you'll stick 1/2 inch poly tube in for the actual drip line.

After the poly tube is inserted in the compression coupling, you'll need to run it the length of your flower bed. There are metal stakes you can purchase to hold it in place, and they look like a U. I don't use them. I just do this on a warm day; once the poly tube is warm it's very flexible and will stay in place. At this point lay out your plants in the bed. This way you'll know where to run 1/4 inch microtube off the main line.

These are the different parts you'll need. I used the DIG brand, it was less expensive.

This is a hole punch; use it to punch holes in the 1/2 inch poly tube. It only costs around two dollars and it's worth it.

Near each plant you'll punch a hole in the 1/2 inch poly tube. Insert a 1/4 inch barb connector in each hole. This is the hardest part. Trying to jam the connector in the little hole takes some strength. Try using saliva on the end of the connector, it lubricates it making it a little easier to push in-seriously.

Next cut a piece of the 1/4 inch microtube that will reach from the main line to the center of your plant.

At the end of the microtube insert a button dripper.

Plant your plants. A stablizer stake will hold the dripper right where you want it.

Place a 1/2 inch end cap on the end of the 1/2 inch poly tube. I like this method better than folding it over and securing it with a zip tie because I can drain the line easier if I need to.

Before you cover the drip line turn it on to test it. Be sure there are no leaks and that all the button drippers are working. If you see a leak, make sure the pieces are all tightly connected. Once you're satisfied, you can cover it with whatever you choose: woodchips, gravel or mulch.
Friday, June 3, 2011
Household Hint
Are you often left with a stubborn film of hairspray on your bathroom counter or mirror? Try wiping it off with rubbing alcohol. Moisten a paper towel and wipe it off.
Friday, May 27, 2011
Outdoor Week: Household Hint
 |
| This isn't my Flower Bed, but it makes me smile. I found the picture here. |

Soil
- Peat Moss-Helps retain moisture and adds organic matter.
- Vermiculite-Lightens soil for better root growth.
- Compost-Adds small amounts of fertilizer and organic matter.
- Sand-Roots like it because it's coarse. Sand is great for carrots.
- Gypsum-Good for clay soils.
- Manure-Usually contains weed seeds, but adds a little fertilizer.
- Manure has little nutrient value.
- Lawns need a fertilizer high in Nitrogen like 20-5-5.
- Gardens need Phosphorus ltry a 16-16-8 mix.
- Phosphorus helps with flower development
- Nitrogen helps with vegetative growth
- Potassium is used for good root development.
Friday, May 20, 2011
Household Hint
This time of year I like to feel the need to wash windows. It's not too hot so the glass doesn't streak as easily. Clean windows make the house feel brighter at least for a day. Now if the rain would stop, I might be able to get outside and get some work done!
A few years ago I invested in a great window squeegee/washer combination and some tablets you add to water for an awesome cleaning solution. I don't have the packaging to tell you what the tablets are to look for them now, sorry.
There are a few windows that are either too small or too odd shape to be cleaned with this tool. When I use Windex and paper towels I like to use this trick: Use vertical strokes on the inside and horizontal strokes on the outside. This way if there is a streak, you'll be able to see what side of the glass it is on. I've washed windows before and have seen a big streak, so I washed one side to get it off only to find the streak was on the other side. So frustrating!
A few years ago I invested in a great window squeegee/washer combination and some tablets you add to water for an awesome cleaning solution. I don't have the packaging to tell you what the tablets are to look for them now, sorry.
 |
| This is the tool I have: Unger Vice Versa Window Squeegee with Washer (14"). The cost is around $25. |
Friday, May 6, 2011
About You Week: Household Hint
Here's the thing. I love being a mom and wife. I like to share with my family as much as the next guy. But, there are times I find something that I want for myself. I don't care if it's my ipod or a pack of gum. There has been a time or two...maybe more...that I have hidden treats (chocolate donuts in particular) to snack on while I'm home alone or the kids are out playing. I don't care if I bring them out while I'm cleaning or crafting. There are just times I need things for me. You know the best part? I do it guilt free.
Friday, April 15, 2011
Spring Week: Household Hint Spring Cleaning
Have you ever used about.com? I love it. You can find answers to so many questions. For Spring Week I wanted to write something about Spring Cleaning. This can be a daunting task. You might make your list so long and overwhelming and when it is left incomplete you feel bad. I typed "Spring Cleaning Tips" and about.com brought a great list with many links to other topics. You can find it here. The thing that caught my eye was how to get the family involved. Who said that it is up to the mom and/or dad to deep clean and organize? To see the full article go here. It is totally worth checking out.
I'll summarize a few of my favorite points:
I'll summarize a few of my favorite points:
- Plan ahead. Be sure the family knows to keep the scheduled day open. Even if it is just for the morning, don't plan anything for that time.
- Be sure to have all the supplies you'll need prior to the cleanup day.
- Turn off cell phones. (Remind your kids that they won't die if they miss a text.)
- Make a playlist with every ones favorite music.
- Be sure chores are age appropriate.
- Hide tokens the kids can find as they clean. Have a reward for who finds the most. This adds a little competition and gets them going.
- Plan a reward for when the job is done.
Thursday, April 7, 2011
Household Hint
My husband and I purchased our first washer and dryer about five years ago. The set was brand new and made by Maytag. I figured they are a very reliable brand and would last a long time. I was wrong! The washer went out a few months ago. We owned it only five years! I also had to have it repaired once. When it went out the second time, the repair man came to fix it. He took it all apart, and discovered it would be better to buy a new one than to put the money into the old washer. Apparently Maytag had a line of washers that were lemons. The man showed me the inside of the drum. It was black with mold! Doesn't that seem counterproductive to clean clothes? He said that this is common. Ewww.
Luckily, there is a way to cut back and slow down the growth of mold in your washing machine. It also prolongs the life of the washer. The first step is to use half the recommended amount of detergent. Laundry detergents and liquid fabric softeners are all so concentrated now. Using the recommended amount adds buildup that the washer doesn't have time to remove during a normal cycle. The second step is to mix equal parts of liquid fabric softener and HOT water in a container. Shake well. Use it just like normal. Of course you only need to worry about the liquid fabric softener if that is what you use. I was skeptical. I didn't think the clothes would be as clean, but they are!
One other thing I do that makes sense in my head is I leave the washer lid up (I have a top loader). I feel like if it is left open it will dry faster and not trap mold causing moisture.
Also, if you are totally grossed out about the thought of your washing machine being full of mold now, buy a washing machine cleaner. There are a few different products out there.
Hopefully this will help save my washer. I know it is already saving money on laundry products!
Luckily, there is a way to cut back and slow down the growth of mold in your washing machine. It also prolongs the life of the washer. The first step is to use half the recommended amount of detergent. Laundry detergents and liquid fabric softeners are all so concentrated now. Using the recommended amount adds buildup that the washer doesn't have time to remove during a normal cycle. The second step is to mix equal parts of liquid fabric softener and HOT water in a container. Shake well. Use it just like normal. Of course you only need to worry about the liquid fabric softener if that is what you use. I was skeptical. I didn't think the clothes would be as clean, but they are!
One other thing I do that makes sense in my head is I leave the washer lid up (I have a top loader). I feel like if it is left open it will dry faster and not trap mold causing moisture.
Also, if you are totally grossed out about the thought of your washing machine being full of mold now, buy a washing machine cleaner. There are a few different products out there.
Hopefully this will help save my washer. I know it is already saving money on laundry products!
Thursday, March 24, 2011
Household Hint
We're leaving the bathroom and heading to the kitchen this week. I know none of you ever let your microwave get like this.
I found this picture on google took this of my own microwave. I'm sure you and your family are all very meticulous about covering your plates and bowls when you use the microwave! In case you're not, here's a great and simple hint for cleaning the microwave. Place a bowl of water (microwave safe bowl of course) in the middle and turn the microwave on for several minutes. You want the water to boil. The steam from the boiling water helps loosen baked on foods. This trick might not be able to loosen everything, and in that case use a little 409!
The second hint comes from Carlee, another author on this blog:
Have a hint you'd like to share? email me! shauntel122@hotmail.com
 |
| Eww, can you see the spaghetti sauce on top and the yellow egg yolk in the center? |
The second hint comes from Carlee, another author on this blog:
Instead of buying childproof knob covers for your gas stove, just pull the knobs off. I store my knobs in the cupboard above my stove. I take one out when I need to turn on a burner or change the heat, and then put it back away while my dinner is cooking. This makes it tricky for tiny hands to accidentally turn on burners. This works just as well as buying expensive knobs, and it's free.

Have a hint you'd like to share? email me! shauntel122@hotmail.com
Thursday, March 17, 2011
Household Hint
My first hint today is one that I never thought twice about until my sister was visiting from out of state. She came over to hang out while I cleaned house. I know, I'm really fun. I was cleaning my bathroom, and just finished scrubbing the inside of the toilet. I always do this first. When I clean the inside I lift the seat up, use the toilet brush and the put the seat down on top of the brush. This keeps it out of the water, but still in the toilet so it can dry while I finish the rest of the bathroom.


Our reader hint comes from Karen. We're sticking to the bathroom with this one too!
That's a great idea. When my kids get their underwear on backwards it always looks so uncomfortable! Thank you Karen!
Have something you'd like to share? Send them to shauntel122@hotmail.com


Our reader hint comes from Karen. We're sticking to the bathroom with this one too!
When my girls are potty training I put a smiley face on the front inside the elastic so they know which way their panties go. Somehow the panties used to always end up backwards... I guess they wanted to see the design better. Now they know the smiley goes in the front.
That's a great idea. When my kids get their underwear on backwards it always looks so uncomfortable! Thank you Karen!
Have something you'd like to share? Send them to shauntel122@hotmail.com
Thursday, March 10, 2011
Green Week: Household Hint
Our first hint helps us go green in our cleaning. White vinegar is inexpensive and environmentally friendly. Do you know the many uses of white vinegar around the house? My favorite is using it to remove hard water buildup. It seriously works wonders. Vinegar is also used as a grease cutter, odor killer, stain fighter and window washer. Go here for a list of many great ways to incorporate vinegar into your cleaning arsenal.
The second hint comes from one of our readers Crystal. Her hint helps save a little green:
Usually we don't eat the ends off the bread loaves. I keep a few bread bags in the freezer and put the ends in the bag and freeze them until we have a whole "loaf" of ends. We keep adding to them through spring, summer and fall. That way in the winter we can go feed the ducks without having to buy bread, and not just tossing our ends :)
Thanks for your hint Crystal! If you have something you'd like to share email me: shauntel122@hotmail.com
The second hint comes from one of our readers Crystal. Her hint helps save a little green:
Usually we don't eat the ends off the bread loaves. I keep a few bread bags in the freezer and put the ends in the bag and freeze them until we have a whole "loaf" of ends. We keep adding to them through spring, summer and fall. That way in the winter we can go feed the ducks without having to buy bread, and not just tossing our ends :)
Thanks for your hint Crystal! If you have something you'd like to share email me: shauntel122@hotmail.com
Thursday, March 3, 2011
Household Hint
Every three months, check expiration dates on medication. Properly dispose of expired items. Some pharmacies have disposal bins. Replace expired items. If there isn't date, call your pharmacist for advice.
Jen also has a very helpful hint. Inside her daughters shoes she draws arrows. When her daughter puts her shoes on the arrows need to point at each other. This helps her get them on the correct foot.

Subscribe to:
Posts (Atom)