
Showing posts with label Dinner. Show all posts
Showing posts with label Dinner. Show all posts
Tuesday, June 5, 2012
Thursday, April 12, 2012

Friday, February 17, 2012

Friday, January 13, 2012

Friday, July 8, 2011
Butternut Squash Soup
My mom isn't a fan of squash, therefore we didn't eat it when I was a kid. I just assumed it was gross and wouldn't like it either. Boy, was I wrong. Now that I'm an adult and know that it won't kill me to try new food I have developed a love for squash and zucchini. I'm really looking forward to harvesting some great squash and zucchini from our garden later this summer.
Recently I came across a butternut squash. I had never tried this let alone made something out of it. My husband automatically suggested soup. Do you feel like there are certain foods that just go better in the Fall and Winter? My initial thought was "Ugh, soup in July? No thanks", but I didn't know what else to do with it so soup it was. I'm really glad too, it was so good.
I searched the Internet for a recipe that used ingredients we like. I found one to use as a starting point and went from there. Here is what I came up with.
What you need:
2 T Butter
1/2 medium onion, chopped
1 stalk of celery, chopped
2 medium carrots, peeled and chopped
3 medium potatoes, peeled and cubed
1 medium butternut squash, peeled, seeded and cubed
32 fluid ounces of chicken broth
Melt the butter in a large fry pan
Cook all the vegetables for about 5 minutes, or until they start to brown
Pour the chicken broth in a crock pot
Place the cooked veggies in the broth
Cover, set on high and let simmer for a couple hours, until the veggies are soft
Transfer the veggies with a little broth to a blender
Blend until smooth
Add broth as you need to help thin the soup until you have the desired consistency
If you would rather do this all on the stove top in a little less time just cook the veggies in a large pot then add the broth. Bring to a boil and then reduce the heat to low. Simmer for 40-60 minutes. Until the vegetables are soft. Continue with the blender like above.
I liked that this soup was hearty, but not heavy. Does that make sense? It was good to eat something filling and delicious, but it didn't make me want to take a nap. I also loved that it was made with fresh vegetables, very healthy. Last thing, it was super easy. I'm all about convenience.
Friday, June 17, 2011
Grilled Teriyaki Chicken
I think the worst time of day during the summer is right around four o'clock; the kids are starting to get hungry and my husband will be home soon. For some reason they think they need to eat dinner. I don't get it! ;) We play hard usually swimming at some point in the day. By four, I'm tired and want to veg out. But being a wife/mom never ends. This is the time to decide what to make for dinner. I hate it. Sure we've tried a menu, I even spent a day making freezer meals for a month. There are still those times that you see a head of lettuce that needs to be used and you didn't pull any meat from the freezer. You're left wondering how to make a meal out of what you have. That's where I'm at today. I've been to the gym, took the kids swimming, did a little housework and I'm beat! Luckily, the hubs won't want dinner until later after he hits the gym and our kids are spoiled and never eat what we eat so I have time to thaw some chicken. That's where this little concoction comes from today; I needed something easy but still delicious!
I'm going to post this recipe just as I made it. We're putting the chicken in a salad and neither of us like a ton of meat, so I made one chicken breast. It will be very easy to adjust for more meat.
What you need:
1 Boneless Skinless Chicken Breast (Really any piece of chicken is fine)
1 c Sprite (Yes the soda)
1/4 c Teriyaki Sauce
1/8 c Soy Sauce (We use low sodium)
1/2 T Brown Sugar
The final four ingredients aren't necessary. They add a little extra flavor that we enjoy, but we always have them on hand.
1 T Seasoned Rice Vinegar
1/2 t Sesame Oil
Small chunk of peeled and sliced Ginger Root
1 Shake of White Sesame Seeds plus more for Grilling
 |
What you need:
1 Boneless Skinless Chicken Breast (Really any piece of chicken is fine)
1 c Sprite (Yes the soda)
1/4 c Teriyaki Sauce
1/8 c Soy Sauce (We use low sodium)
1/2 T Brown Sugar
The final four ingredients aren't necessary. They add a little extra flavor that we enjoy, but we always have them on hand.
1 T Seasoned Rice Vinegar
1/2 t Sesame Oil
Small chunk of peeled and sliced Ginger Root
1 Shake of White Sesame Seeds plus more for Grilling
- Put all ingredients in a bowl stir to combine.
- Marinate at least 30 minutes. Refrigerate if marinading for an extended amount of time. The longer you let the chicken marinate, the better flavor you'll have.
- Place on a hot BBQ grill. Grill until internal temperature reaches 190 degrees. You can do this inside with a fry pan, griddle, broil in the oven or even bake. Whatever you have.
Monday, June 6, 2011
Father's Week: Pizza on the Grill

For Father's Day my family will be doing some barbecuing as I am sure many of you will. I came across this pizza on the grill recipe, and I was excited to try it out. I was thrilled with the results!
I thought it would be really fun to have a pizza bar for Father's Day. You can have a whole table filled with different toppings that everyone can put on their own pizza.
Here are a few changes to the recipe as well as my suggestions and things that worked for me.
Make the Dough
4 1/2 cups of flour
1 tablespoon honey
1 tablespoon oil
1 cup warm water
1 tablespoon yeast
- Put your yeast and warm water in a cup and put it to the side and let the yeast dissolve while you are getting your bowl and ingredients out.
- Combined honey, oil, and water/ yeast mixture and mix together. Add flour and mix or knead for 3-5 minutes.
- The recipe calls for 3-5 cups of flour. I made it once using 4 cups and it tasted great but when I used 4 1/2 it made the dough more stiff and it didn't stick to things as much while you are moving it around.
- Separate the dough into 8 balls. Use your hands to flatten and make a round pizza that is 1/4 inch thick. Mine turned out to be 6-8 inch across.
Barbecue the Pizza
- Warm up your barbeque so it is a medium-high temperature.
- Place the dough onto the barbecue and let it cook for 2 minutes or until brown and puffy.
- Take the dough off the grill and place it on a cookie sheet the cooked side facing up.
- Add your own toppings.
- Place back onto the grill for another 5 minutes or until bottom side is brown and cheese is melted.
Do you want more barbecuing ideas? On Wednesday Erica will be giving us a few tips on grilling corn! I can't wait to see what she will be sharing!!

Monday, May 16, 2011
The BEST Hamburger Buns

Burger Buns
BUNS
- 3/4 cup lukewarm water
- 2 tablespoons butter
- 1 large egg
- 3 1/2 cups all purpose flour
- 1/4 cup sugar
- 1 1/4 teaspoons salt
- 1 tablespoon yeast
TOPPING
- 3 tablespoons melted butter
- 2-5 tablespoons sesame seeds
Directions
4) Brush the buns with about half of the melted butter |


Friday, May 13, 2011
Mozzarella Stuffed Meatballs
My sister Whitney texted me to say she made meatballs stuffed with mozzarella cheese. I think she found the idea on another blog, but I don't know which one. That sounded so good to me. I couldn't decide if I wanted spaghetti and meatballs or what. I just wanted meatballs. I love them!
This recipe is good for so many things. You can make the meatballs smaller and serve as an appetizer with marinara dipping sauce. You can make them large for a variety of dishes. This time we ended up having meatball sandwiches.

What you need:
1 lb. Ground Beef
1/4 c Plain Bread Crumbs
Mozzarella Pearls
Seasonings of your choice (Garlic, Red Peppers, Salt, Pepper, Oregano, Basil, Italian Seasoning etc.)
1 egg
Olive Oil
Friday, May 6, 2011
About You Week: BBQ Dry Rub
I have to admit, this theme was hard for me. What recipe is "About Me?" The other ladies all did great posts on things for you. I love Erica's cleaning plan. I used it as a starting point for my own. She suggested to me that I post my favorite recipe.
So, here's the scoop. I love BBQ: meat, beans, potatoes, cornbread. Oh, I love it. I eat it all year, not just during the summer and grilling season. I came across this recipe online for a dry rub a couple years ago. I don't even know where I found it. The thing that I really like about it is that I can adjust it for my mood. Do I feel like a little more garlic? Sure, add some more. Do I want the meat a little spicier? Add some extra pepper. It is also easy to make a large quantity for larger pieces of meat. I've only tried this on pork. I've done ribs and pork roasts. We usually pull the pork for sandwiches. I feel like it would be good on chicken as well, but I'm not sure about beef.
Dry Rub
1 t Garlic Powder
1 t Red Pepper Flakes
1/2 t Paprika
1 t Fresh Ground Pepper
1 t Mustard Powder
2 t Salt
3 T Brown Sugar
Seal rib sections in foil with a Tablespoon of water in each package and bake for 2 hours on a cookie sheet in a preheated 325 degree oven.
Want a great recipe for cornbread? Buy two boxes of Jiffy Corn Muffin Mix and one box of their Yellow Cake. Mix them all together just like the packages say. Pour in a greased 9x13 pan. Bake at the Cornbread temperature until the bread is golden brown and a toothpick inserted in the center comes out clean.
So, here's the scoop. I love BBQ: meat, beans, potatoes, cornbread. Oh, I love it. I eat it all year, not just during the summer and grilling season. I came across this recipe online for a dry rub a couple years ago. I don't even know where I found it. The thing that I really like about it is that I can adjust it for my mood. Do I feel like a little more garlic? Sure, add some more. Do I want the meat a little spicier? Add some extra pepper. It is also easy to make a large quantity for larger pieces of meat. I've only tried this on pork. I've done ribs and pork roasts. We usually pull the pork for sandwiches. I feel like it would be good on chicken as well, but I'm not sure about beef.
 |
| This is a pork shoulder. It was rubbed the night before, and then placed in our smoker for several hours. We finished it in the oven on medium heat. |
Dry Rub
1 t Garlic Powder
1 t Red Pepper Flakes
1/2 t Paprika
1 t Fresh Ground Pepper
1 t Mustard Powder
2 t Salt
3 T Brown Sugar
- Mix everything together
- Sprinkle on both sides and rub into the meat
Seal rib sections in foil with a Tablespoon of water in each package and bake for 2 hours on a cookie sheet in a preheated 325 degree oven.
Want a great recipe for cornbread? Buy two boxes of Jiffy Corn Muffin Mix and one box of their Yellow Cake. Mix them all together just like the packages say. Pour in a greased 9x13 pan. Bake at the Cornbread temperature until the bread is golden brown and a toothpick inserted in the center comes out clean.
Thursday, March 17, 2011
Prosciutto & Peas
Happy St. Patricks Day! Was anyone visited by a leprechaun today? Anyone get pinched? I sent my kids to school with green hair. I wonder how the school district feels about that (laughing sinisterly to myself). The dish that I am posting today has green peas, so it is totally St. Patrick's Day approved!
I saw this on the cover of the Food Network Magazine for March. It is delicious. I think I loved it more than anyone, and I really felt like there was a piece of heaven in my mouth.

Here's what you need:
4 ounces Prosciutto (Don't be alarmed by the price per pound, around $14, you only need a small amount. It will be about $4. It's so worth it.)
2 T Olive Oil
3 Garlic Cloves
1 T Tomato Paste
1/4 c Heavy Cream (I used whipping cream you can also use half and half)
1 Pound Frozen Ravioli (One day I will make my own)
1 c Frozen Peas
Parsley
Grated Parmesan
Thursday, March 3, 2011
Tortellini Soup

Sorry for the lack of pictures. It's been one of those weeks!
Tortellini Soup
This will feed 2 adults and 2-3 children
1 Bag of frozen tortellini. Ravioli also works, but then it is called ravioli soup.
1 Large (Family Size) can of tomato soup
Garlic Salt
Black pepper
Salad Seasoning
Parmesan Cheese
- Boil water for the tortellini.
- Pour the pasta in the boiling water and cook until the tortellini float to the top.
- Drain & set to the side
- Pour soup into the empty pasta pot. Remember for every can of soup you use, add a can of water also.
- Season with garlic salt, black pepper and salad seasoning to your taste.
- Once the soup starts to boil on the sides of the pot add pasta back into soup.
- Continue cooking until everything is warm.
- We like to stir in a lot of Parmesan cheese but you can just sprinkle it on top if you like less.
Do you have a picky eater? I have two. To get them to try tomato soup I poured it in an orange cup, cooled it down and stuck a straw in it. I was able to fool our daughter, but our son is a little tougher. She tried the soup and loved it, enough that she tried a tortellini and likes those as well. It is amazing what happens when you just try!
Sides to go with this: Bag of salad and garlic bread.
Do you remember this post? Check back next week to see how my problem solved. Hint: I used the idea one of our readers left in the comments!
Thursday, February 24, 2011
Greek Style Baked Chicken
What is your favorite type of food? I love Greek! It is so flavorful and delicious. Greek desserts are even amazing! This week, I'm going to show you how to make a whole chicken with a Greek twist.
Start with adding chicken broth to the bottom of your pan. We'll be adding potatoes also, so add enough so that the spuds will sit in the water. For my broth I used chicken bullion cubes.
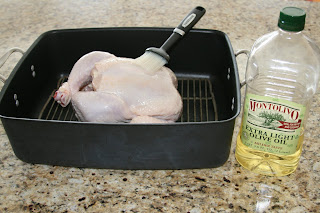 First rinse your chicken and pat dry. Then brush it with olive oil.
 I juiced 3 lemons all over the chicken...
 ...and then shoved the rinds inside the chicken.
 This is what I used to season the chicken. Have you ever used Cavender's? This should be in every kitchen. It is a blend of spices they call All Purpose Greek Seasoning. Oh my, it's my favorite seasoning-this week. FYI, It goes great on chicken and pork cooked any style including BBQ.
 I sprinkled the Cavender's all over, then the Lemon Pepper and finally threw a little garlic on for good measure. Then secretly I added more Cavender's because I love it. (Don't you think they should pay me just a little?)
 I peeled and quartered enough potatoes to feed us and our guests. Do you see how they are more like slices rather than the traditional potato quarter? That was my husbands idea. Around here he is the chef, and I'm more of the sous chef.
 Just throw them into the pan. I juiced one more lemon on top of the potatoes and threw them in the broth as well. I thought we were going to have a last minute guest so I also added carrots later. (I got one that had baked under a lemon-wow a little sour)
I had this meal planned a few days in advance and knew I wanted it to bake low and slow. The lid was on while it baked, so it never got really golden. I did 225 degrees for two hours turned the heat up to 250 degrees for an hour and then about a half hour before meal time turned it up to 300 degrees so the chickens internal temperature would reach 180 degrees. Now would you believe after all that effort I forgot to take a final picture? Call me an amateur. I guess I was too excited to eat it. And let me tell you-Yum!
Start with adding chicken broth to the bottom of your pan. We'll be adding potatoes also, so add enough so that the spuds will sit in the water. For my broth I used chicken bullion cubes.
First rinse your chicken and pat dry. Then brush it with olive oil. I juiced 3 lemons all over the chicken...
 ...and then shoved the rinds inside the chicken.
 This is what I used to season the chicken. Have you ever used Cavender's? This should be in every kitchen. It is a blend of spices they call All Purpose Greek Seasoning. Oh my, it's my favorite seasoning-this week. FYI, It goes great on chicken and pork cooked any style including BBQ.
 I sprinkled the Cavender's all over, then the Lemon Pepper and finally threw a little garlic on for good measure. Then secretly I added more Cavender's because I love it. (Don't you think they should pay me just a little?)
 I peeled and quartered enough potatoes to feed us and our guests. Do you see how they are more like slices rather than the traditional potato quarter? That was my husbands idea. Around here he is the chef, and I'm more of the sous chef.
 Just throw them into the pan. I juiced one more lemon on top of the potatoes and threw them in the broth as well. I thought we were going to have a last minute guest so I also added carrots later. (I got one that had baked under a lemon-wow a little sour)
I had this meal planned a few days in advance and knew I wanted it to bake low and slow. The lid was on while it baked, so it never got really golden. I did 225 degrees for two hours turned the heat up to 250 degrees for an hour and then about a half hour before meal time turned it up to 300 degrees so the chickens internal temperature would reach 180 degrees. Now would you believe after all that effort I forgot to take a final picture? Call me an amateur. I guess I was too excited to eat it. And let me tell you-Yum!
Thursday, February 17, 2011
Pesto Pizza

My husband gets the Food Network magazine every month. If you like cooking and like magazines, you need this. I promise. March is all about Italian. There is a recipe for pizza crust I had to try last week. We love pizza here. It. Was. Awesome.
This recipe makes two 1-lb balls
1 T sugar
1 1/3 c warm water
2 1/4 t active dry yeast (1 packet)
3 T olive oil, plus more for brushing
3 3/4 c flour
1 1/2 t salt
1. Mix the sugar and the water in a bowl. Sprinkle the yeast over the top and let it sit until foamy (about 10 minutes).
2. Stir in the olive oil.
3. Mix the flour and salt together. I used my mixer with the paddle starting with this step.
4. Add in the liquid mixture.
5. Knead the dough until it is smooth and elastic. By hand about this takes about 5 minutes. With a mixer, only about 2.
6. Brush a large bowl with olive oil and put the dough in to rise. It should double in size. This takes about an hour and a half. Be sure to cover it tightly. I love to use the big Tupperware bowls with lids.
7. After it has doubled, separate the dough into two balls. Keep one in the bowl covered tightly.
8. Roll out the dough. I always use a rolling pin. No tossing it in the air for me. I used corn meal and flour to dust the counter when I rolled it out. My husband loves thin crusts, so I rolled one super thin for him. He loved it. The other was about 1/4 inch thick. Once the dough is rolled you can leave it like that and add your toppings, leave about 1/4-1/2 inch border for a crust. If you like a thicker crust to hold, roll the dough out in a circle and then fold the edge in about a 1/4 inch. Do this twice and gently pinch it down after the second fold. If you like stuffed crust, cut a string cheese in half the long way and lay it out along the edge of the dough. Roll the crust over the cheese and pinch it down to seal it.
The magazine says once its rolled out put it on your pizza stone and bake it for 7 minutes, in a preheated 500 degree oven, before you add the toppings. I overlooked that step-oops-and just put the toppings on. It was fine. I would try baking it before for a thicker crust but no way for the thin.

For the topping:
Buitoni Pesto with Basil
Mozzarella Cheese
Sliced Olives
Mushrooms (Do you see those? Don't they look beautiful?)
Artichoke Hearts
Deli Ham (Not pictured. I used Black Forest Boars Head Ham. I bought it from the deli and asked them to shave it paper thin.)
This is so easy! Spread the pesto first. I used about half of the container for one pizza. Sprinkle the mozzarella as much or little as you like. Slice the mushrooms. I kept ours thick; they were just too good. Layer them on. Throw on the olives. Break up the artichoke hearts and slap them on as well. I took the ham and browned it up a little in a frying pan. It was sliced so thin that it felt like I was scrambling it. Then throw it on the pizza too. Then I added a little more cheese to tie it all together.

Before it went in the oven-Yum
Bake at 500 degrees as well. It took about 6 minutes since the crust was so thin. The crust browned very nice. Reminder, do NOT bake the thin crust first
I made a cheese pizza with red sauce for our kids, and since the crust was thicker it took around 9 minutes. Keep in mind since I didn't bake the crust before it wasn't really brown. Everything was cooked and melted, but the crust wasn't golden.
I made a cheese pizza with red sauce for our kids, and since the crust was thicker it took around 9 minutes. Keep in mind since I didn't bake the crust before it wasn't really brown. Everything was cooked and melted, but the crust wasn't golden.
Subscribe to:
Posts (Atom)