

Showing posts with label kids. Show all posts
Showing posts with label kids. Show all posts
Wednesday, June 20, 2012
Monday, June 11, 2012

Tuesday, June 5, 2012

Saturday, March 17, 2012

Friday, December 23, 2011

Friday, October 14, 2011
Halloween Lollipop Shirt (Reverse Appliqué)
I first found this project at Ruffles and Stuff. I really enjoy her blog. She is very talented. When I saw the shirt she made I knew that it was simple enough that I could do it. Unlike the other ladies here at the Polka Dot Umbrella, I do not sew well. Sure I can quilt at an ok level, but as far as following a pattern to make clothes or even refashioning something it's not pretty. I have NEVER made an item of clothing from start to finish. So taking a solid colored shirt to spruce up was right up my alley.

What you need:
1 short or long sleeve plain color cotton t-shirt (I bought mine at Target. Old Navy always has them too.)
Scrap of coordinating fabric
Small strip of ribbon plus some for tying a bow
The first step will show you how much of an amateur I am. My husband bought my sewing machine for me for Christmas a few years back. It is pretty fancy. It had a bag of parts that I thought I'd never need. I still don't know how to use 90% of them. So when I made this shirt I didn't even change my presser foot!!! I just used the 1/4 inch quilter foot. It's all I have ever used. Little did I know that I have a free motion foot. What? Are you kidding me? When I say if I can do this anyone can is 100% true. That takes me to...
Step One: Change your presser foot! Use a free motion presser foot; when I tried it after with the different foot it was much easier.
Step Two: Cut a square out of the fabric you chose for the lollipop. Error on the side of being too big; I used about a 6 inch square piece.

Step Three: Turn the shirt inside out. Pin the fabric to the inside center of the shirt. Pin the fabric with the right side facing down.

Step Four: Draw a swirl on the wrong side of the fabric using a fabric pen or pencil.

Step Five: Sew the fabric to the shirt along the swirly line. I got a little off course, but it was ok.

Step Six: Use scissors to cut between the swirly lines. You will only be cutting the shirt. Trim extra away as needed. Try to keep it even. (After the first wash it will fray and curl a little.)

Step Seven: Pin a small scrap of ribbon to the bottom of the lollipop and sew it on. I tied a small bow and hand sewed that on.

See how simple? Seven steps! I am so excited to try new designs. Check back in December for a great Christmas design using the same reverse appliqué technique.
Friday, August 19, 2011
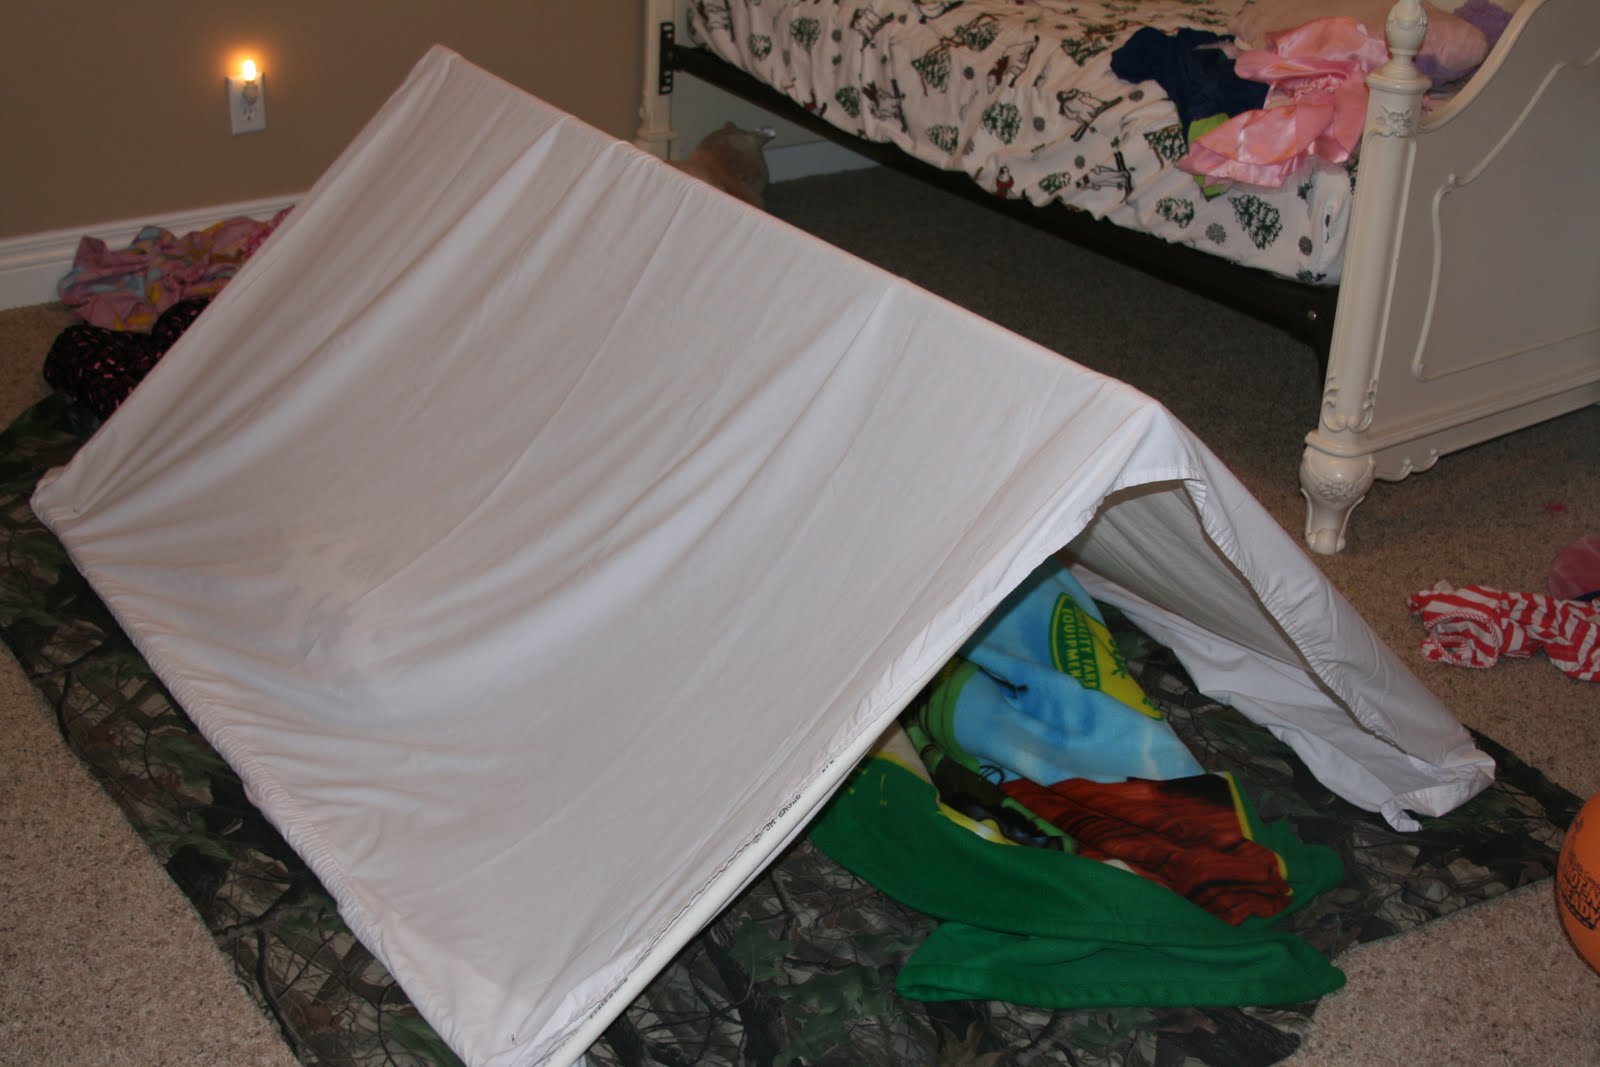
Sprinkler to Tent
Remember this post? I mentioned that the woman who I got this idea from made her kids sprinkler into a tent. Well, we finally got around to doing that. I had to let the sprinkler dry out before I was willing to bring it in the house. Our kids loved it. They sat under it to watch TV and then had a sleepover in it that night. I didn't cleverly sew a cute cover for it. I just used a king size bed sheet off my bed. I used four safety pins, one on each corner, to hold it in place. It was perfect.

I am so sad to see the summer end. Our daughter already started preschool again and our son begins the first grade on the 29th. What are your last minute end of Summer fun plans?
 |
| They are really good at faking sleep. They giggled for a while before finally falling asleep. |
Monday, July 11, 2011
Summer Beaded Necklace

I am finding my summers are a bit different than they have been in the past, now having 2 little busy bodies. With planning, and a little more organization, we have had a blast. We have had get-a-ways, family parties, vacations planned, lots of fun play dates, and water park adventures as I am sure you all have as well.
Here is an idea for your cute little girls to do for a play date. I also think this is the perfect activity to do on a family vacation or family reunion when there is down time and the adults are chatting.
Super simple and darling.


I'm sure at some point we have all made these great beaded necklaces. To make them, I found everything that I needed at Walmart; some type of durable string (mine is 1.8mm stretchy elastic), plastic beads, flowers, buttons, and hot glue.


There are so many fun summer activities to do with kids. Emily did a fabulous post here with some great sites to go look at. Also, don't forget to check out One Pretty Thing for all the great kid craft roundups.
I hope everyone is enjoying there great summer plans!

Saturday, June 25, 2011
Stay Cool This Summer
If I haven't said it before, I LOVE SUMMER! I love doing fun things you can only do when it's warm outside with my kids. This week we decided on a new sprinkler and slip n slide. I found an awesome tutorial here. Be sure to check out the rest of her blog, she shows how you turn this sprinkler into a tent. Yeah, I'm all over that! Also, she compares the price of this to other toy sprinklers you buy. I couldn't agree with her more. Those things never last longer than a week at our house and this only cost $17. This will last so long. That is if the pieces don't get lost. (I'm considering gluing some of the pieces together.)
I'm not going to do a tutorial here, because hers is great. However, here are some hints:
For our slip n slide I simply used leftover black plastic weed barrier from our garden. The entire roll cost $11. I rolled a nice length out, cut it off from the rest and turned the water on. I didn't have any stakes handy so we had to straighten it out a lot, but no on seemed to mind. We just moved the sprinkler down when the end dried out.
This was so fun for us! It was 90 degrees when my son, the neighbor, and I played, so the cold water felt good. Want to be a hero? Slip n Slide with your kids! Show them how a pro does it. They'll worship you!
 |
| Even our dog got in on the action! |
- I used 1/2 inch pipe instead of 3/4. I thought it would be better for our water pressure.
- Be careful about how many holes you drill. I got a little overzealous and drilled a lot. I had to use a new piece of pipe; the water wouldn't make it to the top!
- Trust her when she says use a 1/16 inch drill bit. It really is big enough. I had my doubts.
- You can make the side pieces 3 feet instead of 2.5 if you buy 10 foot lengths of pvc.
- If you buy 10 foot lengths you only need three or four depending on how tall you want it. (If you do taller than three feet, drill a lot less holes to start. You can always add more.)
 |
| This is my boy. Isn't he the cutest thing? |
 |
| Look at this kids dimples! |
 |
| Yes, that's me. I may have had more fun than the boys! |
Thursday, March 10, 2011
Green Week: Leprechaun Lunch

You will need a full bottle of green food coloring. Depending on how green you want your food, and how much food you want to dye, you may or may not use the entire thing. But trust me, one of the small squeeze bottles will not cut it!

Make Jello Jigglers the night before. I used lime because it is already green. Go here for Jiggler directions.
For green Mac n Cheese I just use Kraft. I dye the water green, really green, to boil. This dyes the noodles, helping when I add the cheese. Make it following the directions on the box. Having green noodles isn't enough to get the full effec,t so I also add food coloring once it is made. I stir in a lot of food coloring. Every year I do this I forget how much it takes, and am surprised every time.
Green Rice Krispie Treats are simple. Use your favorite recipe for these. I like the one on the box:
3 T Butter or Margarine
1 Package (10 oz) Regular Marshmallows, or 4 c Miniature Marshmallows
6 c Rice Krispies
- In large saucepan melt butter over low heat. Add marshmallows and stir until completely melted. Remove from heat. Don't overcook or the treats will be hard.
- Add in green food coloring. Dye it as green as you like. Remember, the cereal will make it lighter so once you have it as dark as you like, add a little more.
- Add rice krispie cereal. Stir until well coated.
- Using a buttered spatula or wax paper, evenly press mixture into 13 x 9 x 2-inch pan coated with cooking spray.
I added green grapes, green yogurt, and green Pringles on the side. (I'm not sure if they make green Pringles anymore. They were guacamole flavored.) Hawaiian Punch sells a green Berry Punch. Even though Sprite is clear, it comes in a green can/bottle and would fit the part as well.
Last of all, the Leprechaun even shared some of his gold coins. Some had chocolate, and others had bubble gum. Even though he is naughty, and colors our lunch green, he is still very sweet!
Tuesday, March 8, 2011
St. Patrick Hiding Game
 One of my 2 year old's favorite games, is hide-and-go-seek. This past Valentine's, I thought I would do a heart hide-and-go-seek game. I cut out hearts and then hid them around the upstairs of the house while she sat on the stairs counting to 20. This game was a complete hit. I thought I would duplicate the game for March's holiday, St. Patrick's Day.
I purchased a foam sheet pack from the dollar store that had several colors in it. I made clovers and pots of gold. I added numbers to mine because we are working on number recognition, and this was another way I could implement the concept.

I used a white cardstock piece of paper for her to collect her hidden clovers and pots of gold. This helps her visualize how many she still needs to find, and again it helps her match up her numbers.

I used some power tack, also purchased from the dollar store, because I do not want tape pulling off my nicely painted walls. Kind of a paranoid thing, but, it also keeps sticky for much longer than tape does.

This game is super simple to put together, and it gives my little gal hours of enjoyment.

Wednesday, February 9, 2011
Heart Hair Clips

I love appliques on just about anything! After working on a large applique project I thought I hit jackpot with a new fun idea. I made these darling clips for my girl last year for Valentines and found she wore them all year long. What better goes with most girly outfits than Pink and Hearts?
Heart Hair Clip
Super simple, original and darling!
You will need:
2 Pieces of fabric. The size will depend on how many you are making and how big you will want your hearts.
1 Piece of batting.
Buttons
Sewing Machine

Take 1 piece of your material and draw your hearts on it.


Now take both pieces of material and your batting and make a quilt sandwich. Start with your bottom piece of material facing down, then your batting, and end with your top piece of material that has the drawn hearts facing up. Pin in between your drawn hearts making sure to catch all three layers of your quilt sandwich.

Following the lines you have drawn, sew around each heart using a tight a tight zigzag stitch on your sewing machine. You will want to reduce your stitch length to about 1.0. If your machine comes with a satin stitch, this is a good time to try it out.

Cut around each heart with pinking shears.

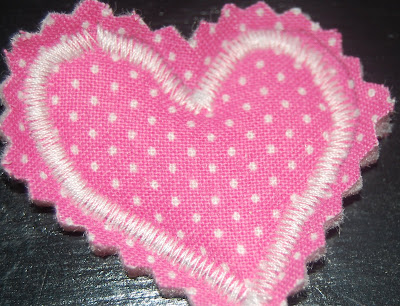
Sew on a button and add a clip to the back using hot glue. Now you are done! Sit back and admire how darling your little girl looks in her new heart hair clips. These would also make great Valentines (clipped to cards) for all the little girls in your life.


Subscribe to:
Posts (Atom)