

Showing posts with label Block of the Month. Show all posts
Showing posts with label Block of the Month. Show all posts
Monday, December 5, 2011

Friday, December 2, 2011

Friday, September 2, 2011
Block of the Month: September

The following are for two 6 1/2 squares. Do not connect the two squares together.
Background B 8 – 2 3/8 squares (cut diagonally once)
Color #1 A 4 – 3 1/2 squares
Color #2 C 4 2 5/8 squares
Find the centers of C and the long edges of B. Sew together. Press towards background. Now sew the opposite edge. Press. Continue with the two remaining edges. This ‘square in a square’ should measure 3 1/2 inches. Make a total of four of these. Now lay them out, match with an A square. Assemble two blocks like you would make a 4-patch. Blocks should measure 6 1/2 inches.

#17 Nine Patch (Make two)
Background 3 – 2 1/2 x 8 rectangles
Color 3 – 2 1/2 x 8 rectangles
Sew 2 sets of strips together following this order: Color-Background-Color and Background-Color-Background. Press towards color on both strip sets. Now sub-cut into three 2 1/2 sections from both strip sets. Place opposite rows together and sew until you have connected all rows. Press all seams in the same direction. Block should measure 6 1/2 x 12 1/2.

These are paper pieced. Piece together two blocks. The blocks should measure 6 inches square. Sew them together side by side. Block should measure 6 x 12 inches.


Block of the Month: August

#18 Birds in the Air
Background:
AA 2 – 3 7/8 squares HST
B 1 – 10square (cut once diagonally)
Color:
AA 2 – 3 7/8 squares HST
A 2 – 3 7/8 squares (cut diagonally once)
Using all AA pieces, make HST (Half Square Triangles). Square up to 3 1/2 inches. You will only use three of these. Lay your finished HST’s out into rows, combining the A triangles (you will only use three of these as well). Follow the diagram above. Sew rows together, pressing each row in opposite directions. Now sew rows together. Press rows downward. Place the large background triangle with the ‘rows’. Sew together and press towards background triangle. Square block up to 9 1/2 inches.
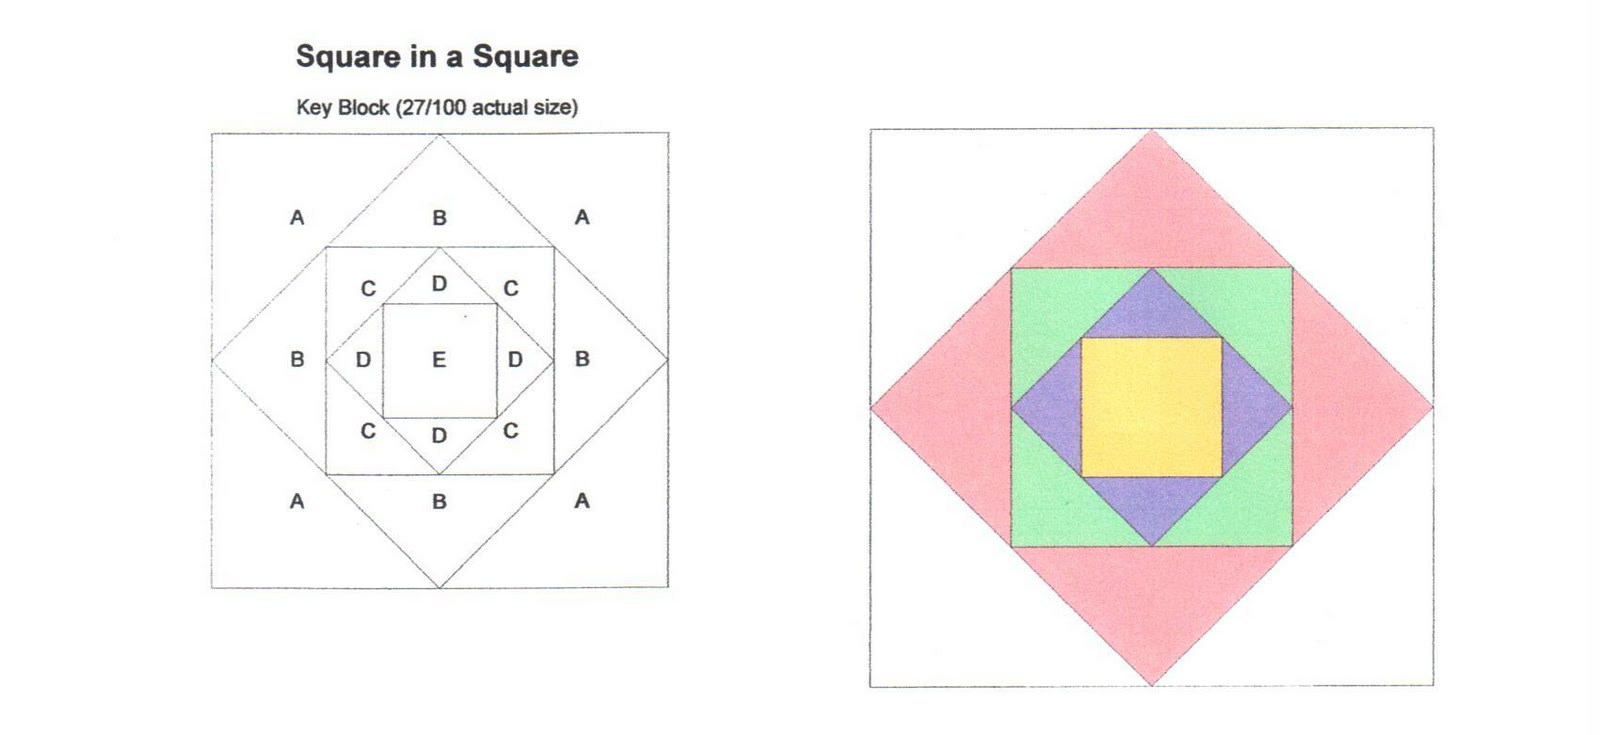
#19 Square in a Square
E Yellow Center
D Purple 1 – 3 1/2 square (cut twice diagonally)
C Green 2 – 3 1/8 squares (cut once diagonally)
B Pink 1 – 5 3/4 square (cut twice diagonally)
A Background 2 – 5 1/2 squares (cut once diagonally)
Find centers on all long edges of triangles. Place centers of E and D right sides together. Sew, and press towards triangle. Now repeat on opposite side. Continue until all 4 sides are finished. Repeat with C, B, and A. Finished block is 9 1/2" square.
As you sew each ‘square’ on, blocks should measure the following:
D - 3 5/8 C - 4 7/8 B - 6 7/8 A - 9 1/2

#21 Indian Hatches
Background B 4 – 3 1/2 squares
Color A 8 – 2 7/8 squares
Draw a diagonal line of the back of each A square. Place A and B right sides together matching two sides and a corner. Sew directly on the diagonal line. Press to set threads. Cut off two bottom layers. Press towards color (A). Repeat on opposite corner. Make sure you still have a 3 1/2 square. When all four squares are done, lay them out like a 4 patch. Sew together. Block should measure 6 1/2 inches.
Block of the Month: July

#11 LeMoyne Uneven Nine Patch
Background A 4 - 2 1/4 x 3
Fabric 1 (center) B 1 – 3 square
Fabric 2 (corners) C 4 – 2 1/4 squares
Begin by laying all of your pieces out to look like a 9 patch. Sew your 3 rows together, pressing towards the dark fabric within each row. Sew rows together, press away from the center row. Block should measure 6 1/2” square.

#14 Shoo Fly
Background:
AA 2 – 2 7/8 HST
B 4 – 2 1/2 squares
Color:
AA 2 – 2 7/8 squares HST
BB 1 – 2 1/2 square center
Start by making the four HST (Half Square Triangles) using the 2 7/8 squares from each fabric. Square up these HST to 2 1/2. Press to the darker fabric.
Next, lay pieces out like a 9 patch. Sew together into 3 rows. Press towards background fabric for less bulk. Sew rows together, press towards center row. Block should measure 6 1/2" square.

#15 Paper Pieced Heart
A document on how to paper piece has been sent to all the Block of the Month followers. If you need the directions on how to paper piece please leave a comment with your email address. If you're not interested in paper piecing sew any quilt block you like, it should just square up to 6 inches.

#22 Square and a Half
Background:
AA 2 – 3 7/8 squares HST
B 4 – 3 1/2 x 9 1/2
Color 1 (dark):
AA 2 – 3 7/8 squares HST
A 8 – 3 1/2 squares flip corners
D 1 – 4 1/2 square QST
Color 2 (med):
C 4 – 3 1/2 squares
D 1 – 4 1/2 square QST
Color 3 (light):
C 1 – 3 1/2 square center
D 2 – 4 1/2 squares QST
Begin by making the four AA, HST corners. Square up to 3 1/2, press towards the dark. Next, draw diagonal lines on the back of each 3 1/2, dark fabric. Sew these directly on the line to piece B using the block above as a guide for direction.
Next, QST, sew one of each Color #3 to Color #1 and Color #2. Sew like you are making a HST. Cut on line and press towards the dark. Do not square up yet. Now take one dark unit and place it with one medium unit. Draw a diagonal line, sew on both sides of line. Cut on line. Now you can square up to 3 1/2.
Friday, July 15, 2011
Block of the Month: June
So sorry that we got behind on the Block of the Month for June! Emails have been sent out with the PDF files, if you are already on the monthly email list and did not receive the email let us know. July's blocks should be posted at the end of the month. Send in pictures of your finished blocks. We'd love to see them!![]()
![]()
![]()

#9 New Album
Background:
A 4 – 2 1/4 squares
C 2 – 3 1/2 squares (cut diagonally once)
Color 1:
B 4 – 2 1/4 x 5 7/8
Color 2:
D 1 – 4 3/8 square
Begin by laying out all the pieces.
Find the center of each side of D and the long edges of C by folding each piece right sides together and finger pressing the center. Match these ‘centers’ together, sewing opposites sides first, and then press towards triangle. Sew remaining two sides, press towards triangle. Block center should now measure 5 1/2”.
Sew corner squares A with sides B for top and bottom rows. Sew remaining B pieces to each side of block center. Press within each row towards the B pieces. Connect the rows together by pressing away from the center. Block should measure 9 1/2” square.

#12 Old Maid’s Puzzle
Background:
AA 3 – 3 1/8 squares
B 4 – 2 3/4 squares
A 2 – 3 1/8 squares (cut diagonally once)
Color 1:
AA 3 – 3 1/8 squares
Color 2:
C 1 – 5 3/8 square (cut diagonally once)
Begin by making 6 half square triangles using all of the AA pieces. Square these up to 2 3/4 inch unfinished. Press towards the darker fabric. Now lay these with all of the other pieces to resemble the finished block above.
Continue to sew the block in sections. Starting with the two ‘4-patches’ using 4 of the half square triangles and the B squares. These sections should measure 5”.
Sew short side of A with remaining two AA. Press towards A. Sew another A to adjacent edge. Press towards A. Double check placement of A’s with block above. Now place this unit with C and sew along the long edge. Press towards C. Make two sets of this unit. Unit should measure 5”.
Lay the four units out like a 4-patch and sew together. Block should measure 9 1/2”.

#16 Swamp Angel
Background:
AA 2 – 7/8 squares
B 2 – 4 1/2 squares
C 1 – 3 1/2 square
Color 1:
AA 2 – 3 7/8 squares
Color 2:
B 2 – 4 1/2 squares
Begin by making 4 half square triangles using all of the AA pieces. Square up to 3 1/2”. Press towards the darker fabric. Lay these out with center to start forming the block.
Quarter Square Triangles: Using all B pieces, draw line diagonally on wrong side of the two background pieces. Sew background/color 2 together as if you are making half square triangles. Cut on drawn line and press towards the darker fabric. Now place these two ‘halves’ right sides together so Color 2 fabrics are opposite from one another. Draw line diagonally crossing both fabrics. Sew on both sides of drawn line. Cut on line, press, and square up quarter square triangles to 3 1/2”.
Lay units out to resemble a 9-patch. Sew together into 3 rows. Press away from the quarter square triangle within each row. Connect rows together. Block should measure 9 1/2”.
Sunday, May 29, 2011
Block of the Month - May

All of these measurements are square
Background:
D 2- 2 5/8
B 1-3 7/8
C 1-5 1/8
A 1-6 7/8
Color #1
D 1-2 5/8
B 1-3 7/8
C 1-5 1/8
A 1-6 7/8
Color #2
D 1-2 5/8
B 1-3 7/8
C 1-5 1/8
A 1-6 7/8
For fabrics A,B,C cut them all once diagonally. You will only use 1 half of each of these for this block.
Lay out all of you pieces according to the picture. Begin by sewing your 2 background D pieces to each color D piece. Press towards the color. Sew these segments together to form a 4-patch.
Next, you will use your B pieces. Find the center on the long edge of the triangle. Match this point up with the seams on the 4-patch. Sew and press towards the triangle. Sew opposite side on next, press, then continue to add the two sides one at a time.
Now use your C pieces and continue as you did with the B pieces. Finally, use your A pieces same as above. Press all seams outward. Block should measure 12 1/2 square.

Background:
C 2-4 1/2 squares Cut once diagonally
Main Color
D 2-3 squares
B 4-1 3/4 x 7 3/4
A 4-2 7/8 squares
2nd Color
D 2-3 squares
B 4-1 3/4 x 7 3/4
Begin by sewing all of your D pieces together to form a 4-patch. Next, using background c pieces, find the center on the long edge of the triangle and match it to the seams of the 4-patch. Sew, press outward. Repeat with opposite side, then the other two sides. Center made, set aside.
Side sections: use all of your B pieces. Sew different fabrics together along one edge. Press to darker fabric.
Lay out all of your finished sections, along with your A squares, matching the picture. Sew the block together s you would a 9-patch. Press your seams in opposite directions for each tow. Finished block should measure 12 1/2 square.
Sunday, May 1, 2011
Block of the Month - April
Can you believe that after these blocks we will be able to sew the top two rows of the quilt together? You will need to sew a block of 4 half square triangles together. It is the block to the right of the Block #5 Friendship Star. The half square triangles should be squared to 3 ½ inches. If you feel ambitious, there are a total of 29 half square triangles in the quilt; you can make them all now.
Have you been making this quilt along with us? We’d love to see some pictures of how your quilt is coming! Did you just find us and would like to be added to the email list to receive the PDF version? Leave a comment with your email here, or email shauntel122@hotmail.com.

#4 Double Tulip
 Background:
A 2-2x3 ½
B 8-2x2
E 2-2x2
EE 2-2x2
Inside Flower:
F 2-2x3 ½
G 2-2x5
Outside Flower:
D 2-2x5
C 2-2x6 ½
You will be making two identical blocks with the following instructions (the above cutting instructions are for both blocks):
Sew background E to tulip center EE. Press to darker fabric. Add the background A, press towards A. As you attach each piece, until you finish the block, press towards most recently added piece.
Lay above section down with flower pieces F, G, D, and C. Draw diagonal lines on the back of background B squares. Lay these squares on each flower petal, noting the direction your diagonal line lays. When you are certain of placements then sew background B to each flower petal. When petals are complete, attach-then press, petals to your center section in the following order: F,G,D,C. Blocks should measure 6 ½ square. Sew 2 blocks together to form block #4 (6 ½ x 12 ½).


#8 Garden Patch
Background:
A 2-3x16 strips
B 4-6x6 squares
Fabric #1:
A 2-3x16 strips
Fabric #2:
C/D 4-4x7 rectangles
Begin by sewing background A to fabric #1 strips together. You will have two strip sets. Press towards darker color. Sub-cut these strips into 10-3” sections (five from each strip). Make opposite sides to form five 4-patch blocks.
Print four of the B/C/D paper piecing guides. (If you want an extra to save with the quilt pattern, print five.) Be sure the outside line measures 5.5 inches. Cut two of the Fabric #2 rectangles diagonally from the top right corner to the bottom left corner. Cut the remaining two rectangles from the top left corner to the bottom right corner. Paper piece C and D onto B. Cut on the outside line. To learn how to paper piece go here.
Lay out all sections to make block. Sew together in rows. Block should measure 15 ½ inches.
To see the blocks from past months click the button on the side bar. As always if you have any questions or problems please let us know.

Sunday, April 3, 2011
Block of the Month - March (Block 3)
We know everyone has been on the edge of their seats waiting for the third March block. Well your wait has ended. If you missed the first two blocks for March click here.

#1 Odds and Ends
Background:
C 2- 2 ¾ squares
DD 1-3 1/8 square
B 2-10 x 1 5/8 strips
Blue:
A 2-7 ½ x 1 5/8 strips
DD 1-3 1/8 square
Green:
A 2-7 ½ x 1 5/8 strips
B 2-10 ½ x 1 5/8 strips
Make 2 half square triangles using Blue and Background ‘DD’ units. Press to blue. Layout with ‘C’ squares to form center of the block.
Make 4 side strip sets using Green and Background ‘B’ pieces. Sew two sets along the 10 ½ side. Press to Green. Sub-cut into four 5 inch segments. Side strips made.
Corner Four-Patch units use Blue and Green ‘A’ pieces. Sew two sets along the 7 ½ side. Press to the darkest fabric. Sub-cut eight 1 5/8 inch segments. Flip one segment over, onto another segment, nesting center seams and sew. Press. Make four 4-Patch units.
Lay all units out to form the Block using the picture as a diagram. Sew rows together. Block should measure 9 ½ inches.
Our sample blocks will be added later on once we get them finished. As always if you have any questions or problems please feel free to contact us. Good luck!
Our sample blocks will be added later on once we get them finished. As always if you have any questions or problems please feel free to contact us. Good luck!

Sunday, March 27, 2011
Block of the Month - March
It's that time again, welcome back! There are three blocks for the month of March, so let's get started. Don't worry if you haven't finished the other blocks yet you still have plenty of time. Find the February blocks here, and the January block here.
If you'd like to receive our Block of the Month in a pdf file for this month or past months, please leave a comment below with your email, or send an email to shauntel122@hotmail.com.

If you'd like to receive our Block of the Month in a pdf file for this month or past months, please leave a comment below with your email, or send an email to shauntel122@hotmail.com.


Background:
A 2-3 7/8 squares
B 2-3 inch squares
4 Colors-from each color cut:
A 1-3 7/8 square
B 1-3 inch square
Cut ALL of the above squares in half ONE TIME diagonally. Lay out all of the triangles using the picture of the block as a reference. Sew the block together in units. 4 half square triangles (corners), 1 Quarter Square Triangle (center). And 4 pieces units (sides). Try to press to the darkest color.
When all units are made, sew into rows, then sew rows together. Block should measure 9 ½ square.


Background:
A 4-2 ½ squares
BB 2-2 7/8 squares
Color:
A 1-2 ½ square
BB 2-2 7/8 squares
Make four half square triangles using all BB pieces. Square up to 2 ½ inches. Lay HST’s out with all of the A pieces using picture as reference. Sew together into rows, then connect rows together. Block should measure 6 ½ square.
Now you have completed two more blocks, way to go!! There is one more block for March, but we will post it next week. Remember if you have any questions or problems, please let us know. We would love to help out.
Wednesday, March 23, 2011
Block of the Month - March
We have the newest blocks for the month of March. Check back for the tutorial! If you are interested in receiving the pdf file for the blocks please leave a comment here with your email address, or email me direct shauntel122@hotmail.com. If you received the blocks for last month but have not received the new ones, please leave your email again. I apologize if anyone was overlooked! It's not too late to get started on this quilt either! Let me know if you need the blocks for January or February.
Sunday, March 6, 2011
Block of the Month - February
Welcome back! Let's get started on the two blocks for February.
See January's block here.


 Order:
See January's block here.


February 1
Block #6 - Log Cabin
Background:
G - 2 x 3 1/2
F - 2 x 5
E - 2 x 6 1/2
D - 2 x 8
B - 2 x 9 1/2
A - 2 x 11
Color 1 (center)
H - 3 1/2 square
Color 2
E - 2 x 6 1/2
F - 2 x 5
Color 3
B - 2 x 9 1/2
D - 2 x 8
Color 4
A - 2 x 11
C - 2 x 12 1/2
Sew Background G to Color 1 (center) 3 1/2 square H. Press outward. Continue with each piece in the order below always pressing toward the last piece sew. Block should measure 12 1/2 inches square.
 Order:
Background F
Color 2 F
Color 2 E
Background E
Background D
Color 3 D
Color 3 B
Background B
Background A
Color 4 A
Color 4 C
Any questions or problems just let us know in the comment section and we will answer them as soon as we can, also as a comment.


February 2
Block #3 - Flower Basket
For a full tutorial read more. . .
Block of the Month - January
We are a new blog and are still trying to work out all the kinks! Isn't it fun? That being said, we are a little late in starting our new feature, Block of the Month. This first block is from January, the next two are from February, but don't worry the blocks for March will not be posted until the last Sunday of the month. Also, remember you have all year to catch up if you get behind. If you would like a PDF file emailed to you with the quilt grid and cutting and sewing directions email Shauntel directly: shauntel122@hotmail.com, or leave a comment with your email address. We are happy to answer any questions if the directions seem unclear. Just leave questions as comments; maybe someone else has the same question. We will answer all questions as quickly as we can, also as a comment.
Before we get started, we need to thank Julie Stubbs. She is the one who designed this quilt and is teaching Shauntel to quilt right now! She is truly amazing. Julie is also a quilter for hire. She owns an amazing quilting machine. She lives in South Jordan, Utah. If you are in the area and need some quilting done she charges a penny and a half per inch. If you'd like her phone number, you can also email Shauntel.
Now let's get on with quilting!

January
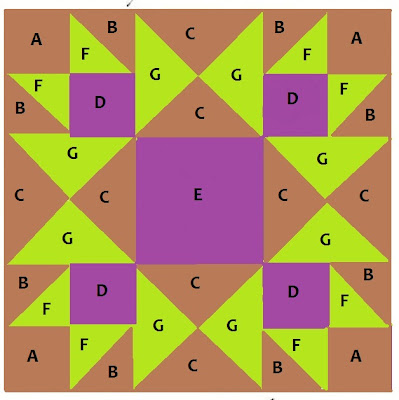
Contrary Wife Block #7
Background:
4-3 1/2 inch square - A
4-3 7/8 inch square - B
2-7 1/2 inch square - C
Dark:
4-3 1/2 inch square - D
1-6 1/2 inch square - E
Medium:
4-3 7/8 inch square - F
2-7 1/2 inch square - G
Start by laying out your one patch squares (A,D,E).
Next, take your 4-3 7/8 squares in background (B) and medium (F) fabric and make 8 half square triangles. Lay them where they belong. Attach together each corner '4 patch'.
Now take the 2-7 1/2 squares in background (C) and medium (G) fabrics and make 4 quarter triangle squares. Lay them where they belong.
Sew block together as if it were a large 9 patch. Remember to press as you go, this will help things line up. Square block to 18 inches.
Click here for instruction on half and quarter square piecing.

Before we get started, we need to thank Julie Stubbs. She is the one who designed this quilt and is teaching Shauntel to quilt right now! She is truly amazing. Julie is also a quilter for hire. She owns an amazing quilting machine. She lives in South Jordan, Utah. If you are in the area and need some quilting done she charges a penny and a half per inch. If you'd like her phone number, you can also email Shauntel.
Now let's get on with quilting!

Contrary Wife Block #7
Background:
4-3 1/2 inch square - A
4-3 7/8 inch square - B
2-7 1/2 inch square - C
Dark:
4-3 1/2 inch square - D
1-6 1/2 inch square - E
Medium:
4-3 7/8 inch square - F
2-7 1/2 inch square - G
Start by laying out your one patch squares (A,D,E).
Next, take your 4-3 7/8 squares in background (B) and medium (F) fabric and make 8 half square triangles. Lay them where they belong. Attach together each corner '4 patch'.
Now take the 2-7 1/2 squares in background (C) and medium (G) fabrics and make 4 quarter triangle squares. Lay them where they belong.
Sew block together as if it were a large 9 patch. Remember to press as you go, this will help things line up. Square block to 18 inches.
Click here for instruction on half and quarter square piecing.

Have fun and GOOD LUCK!!!
Subscribe to:
Posts (Atom)