
Showing posts with label Quilting. Show all posts
Showing posts with label Quilting. Show all posts
Wednesday, June 27, 2012

Friday, April 13, 2012
Tuesday, February 28, 2012

Wednesday, December 7, 2011

Monday, December 5, 2011

Friday, December 2, 2011

Friday, October 28, 2011
Half Square Triangle Tutorial
I promised a tutorial on how to make half square triangles using the ruler from our giveaway. Congratulations to our winner. Don't forget the coupon code blog is good through December 31 for 25% off your entire purchase! Shop online at Quilt in a Day now.
HST's are very simple and using this great tool makes them even easier. I like that when you are finished, your square is already squared up and ready to sew.
Step 1: Lay out two squares of fabric that are the same size but different colors. Add 1/2" seam allowance. So if you want your final square to measure 4 inches cut your fabric 4 1/2".


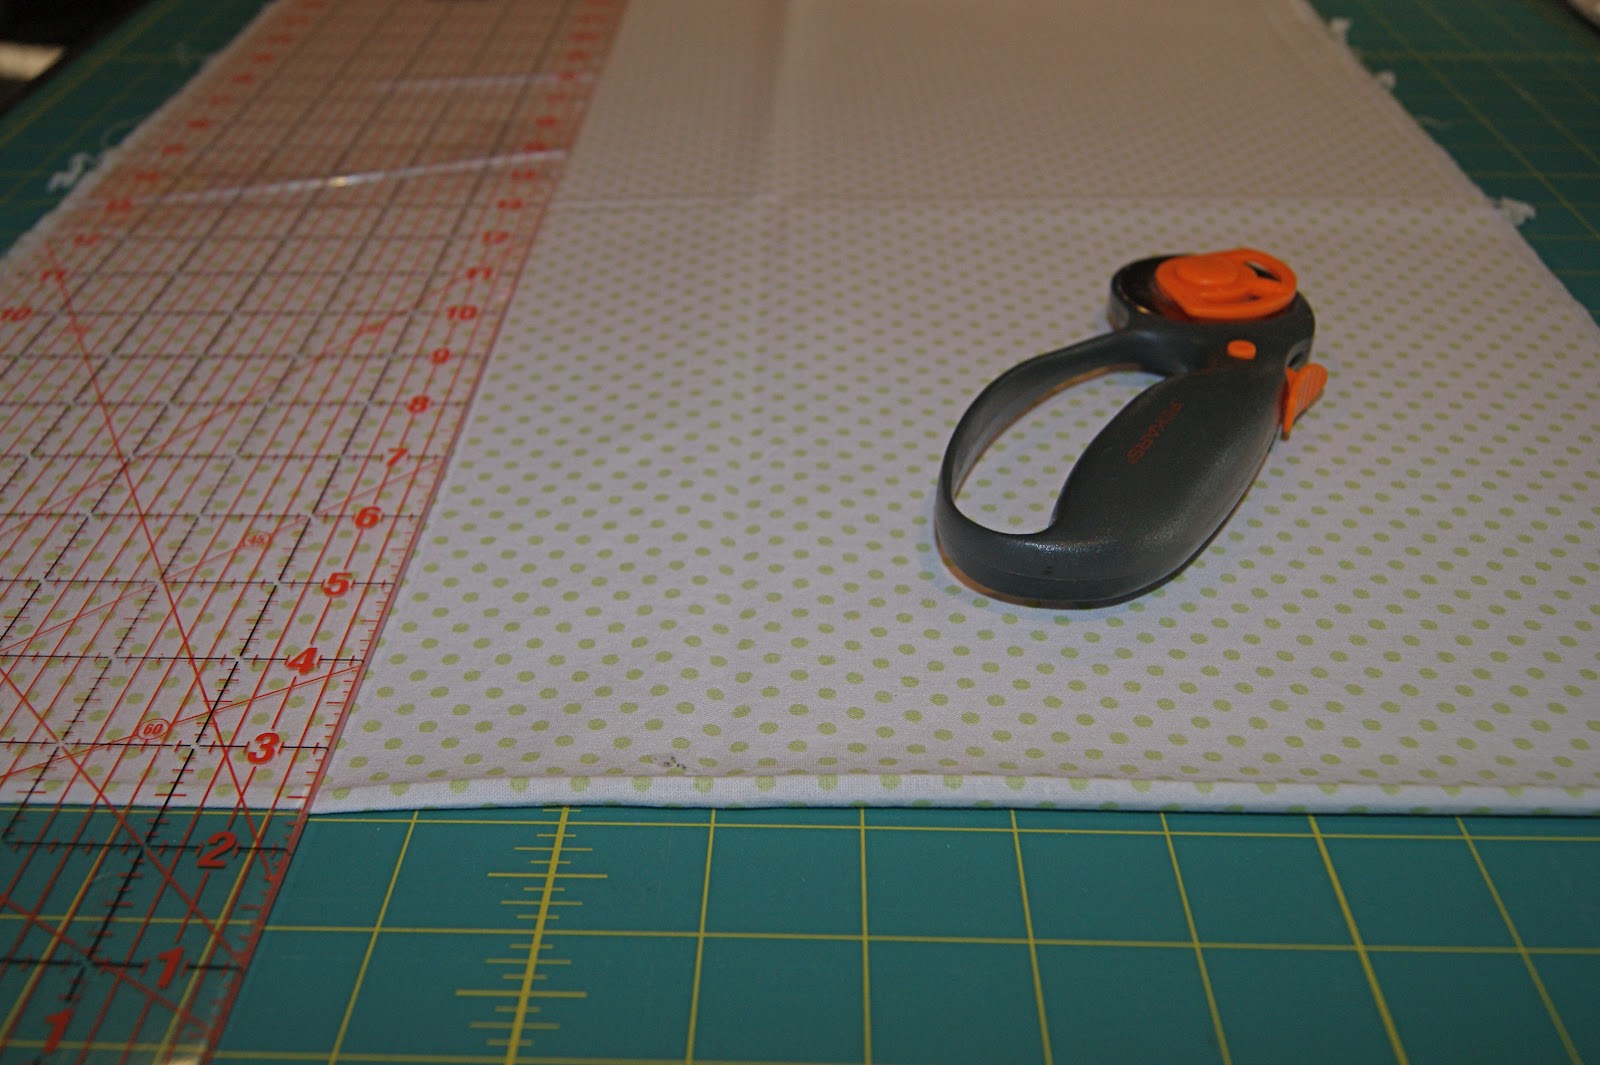
Step 6: Place the Quilt in a Day Square Up Ruler 4" line on the seam (or whatever size your sewing). Center the tip of the ruler with the tip of the triangle the best you can.
 Step 7: Cut the excess fabric off each side of the ruler.
 Step 8: Open square and press towards the darker fabric.


HST's are very simple and using this great tool makes them even easier. I like that when you are finished, your square is already squared up and ready to sew.
Step 1: Lay out two squares of fabric that are the same size but different colors. Add 1/2" seam allowance. So if you want your final square to measure 4 inches cut your fabric 4 1/2".
Step 2: Draw a line down the center on the wrong side of one fabric. Pair the squares ride sides together.

Step 3: Sew 1/4" from both sides of the drawn line.

Step 4: Cut in half on drawn line.

Step 5: Cut the corners off on the bottom of the triangles.
 |
| Do you see how I cut from the corner of the seam down on a diagonal? This will get rid of the dog ears when you press it open. |


Wednesday, September 7, 2011
How to Layer a Quilt
Over a year ago I made a quilt top for my husband for our anniversary. I am just barely getting around to quilting it! I know pathetic right? I love the top and how it turned out. Both of us attended the University of Utah so I decided to make up my own pattern with a version of the logo. I also found some adorable fabric with the logo all over it. I do have to say that making the top of this quilt was extremely boring! I used over 650, 3" squares. Crazy! Anyway, I thought I would share how I layer my quilts in preparation for quilting.

First I layed out my backing on the floor, this quilt was huge so I had to clear out some furniture in order to lay it out flat.

Using straight pins I pulled the backing tight, without stretching the material. If you stretch the material it will cause wrinkles when you unpin it. I always do this on the carpet so the pins will hold the fabric in place. I also angle the pins away from the fabric so it doesn't move or shift.

Once you have the backing secured you can lay out the batting. Pin the batting into place the same way you did the backing. Then you can lay out the top of the quilt and pin it into place. I always make sure that there are no wrinkles or bumps.

After I have everything straight and even it is time to pin it all together. I love using quilting pins, shown above. They are bent a little to keep the quilt straight.

I am planning on quilting on every other square so I pinned accordingly.

Now you are ready to start quilting. This really is super easy. I have never had a problem with the backing bunching up. I am excited to get this done so we can cuddle under it and watch the Utah game! Go Utes!


Friday, September 2, 2011
Block of the Month: September

The following are for two 6 1/2 squares. Do not connect the two squares together.
Background B 8 – 2 3/8 squares (cut diagonally once)
Color #1 A 4 – 3 1/2 squares
Color #2 C 4 2 5/8 squares
Find the centers of C and the long edges of B. Sew together. Press towards background. Now sew the opposite edge. Press. Continue with the two remaining edges. This ‘square in a square’ should measure 3 1/2 inches. Make a total of four of these. Now lay them out, match with an A square. Assemble two blocks like you would make a 4-patch. Blocks should measure 6 1/2 inches.

#17 Nine Patch (Make two)
Background 3 – 2 1/2 x 8 rectangles
Color 3 – 2 1/2 x 8 rectangles
Sew 2 sets of strips together following this order: Color-Background-Color and Background-Color-Background. Press towards color on both strip sets. Now sub-cut into three 2 1/2 sections from both strip sets. Place opposite rows together and sew until you have connected all rows. Press all seams in the same direction. Block should measure 6 1/2 x 12 1/2.

These are paper pieced. Piece together two blocks. The blocks should measure 6 inches square. Sew them together side by side. Block should measure 6 x 12 inches.

Block of the Month: August

#18 Birds in the Air
Background:
AA 2 – 3 7/8 squares HST
B 1 – 10square (cut once diagonally)
Color:
AA 2 – 3 7/8 squares HST
A 2 – 3 7/8 squares (cut diagonally once)
Using all AA pieces, make HST (Half Square Triangles). Square up to 3 1/2 inches. You will only use three of these. Lay your finished HST’s out into rows, combining the A triangles (you will only use three of these as well). Follow the diagram above. Sew rows together, pressing each row in opposite directions. Now sew rows together. Press rows downward. Place the large background triangle with the ‘rows’. Sew together and press towards background triangle. Square block up to 9 1/2 inches.
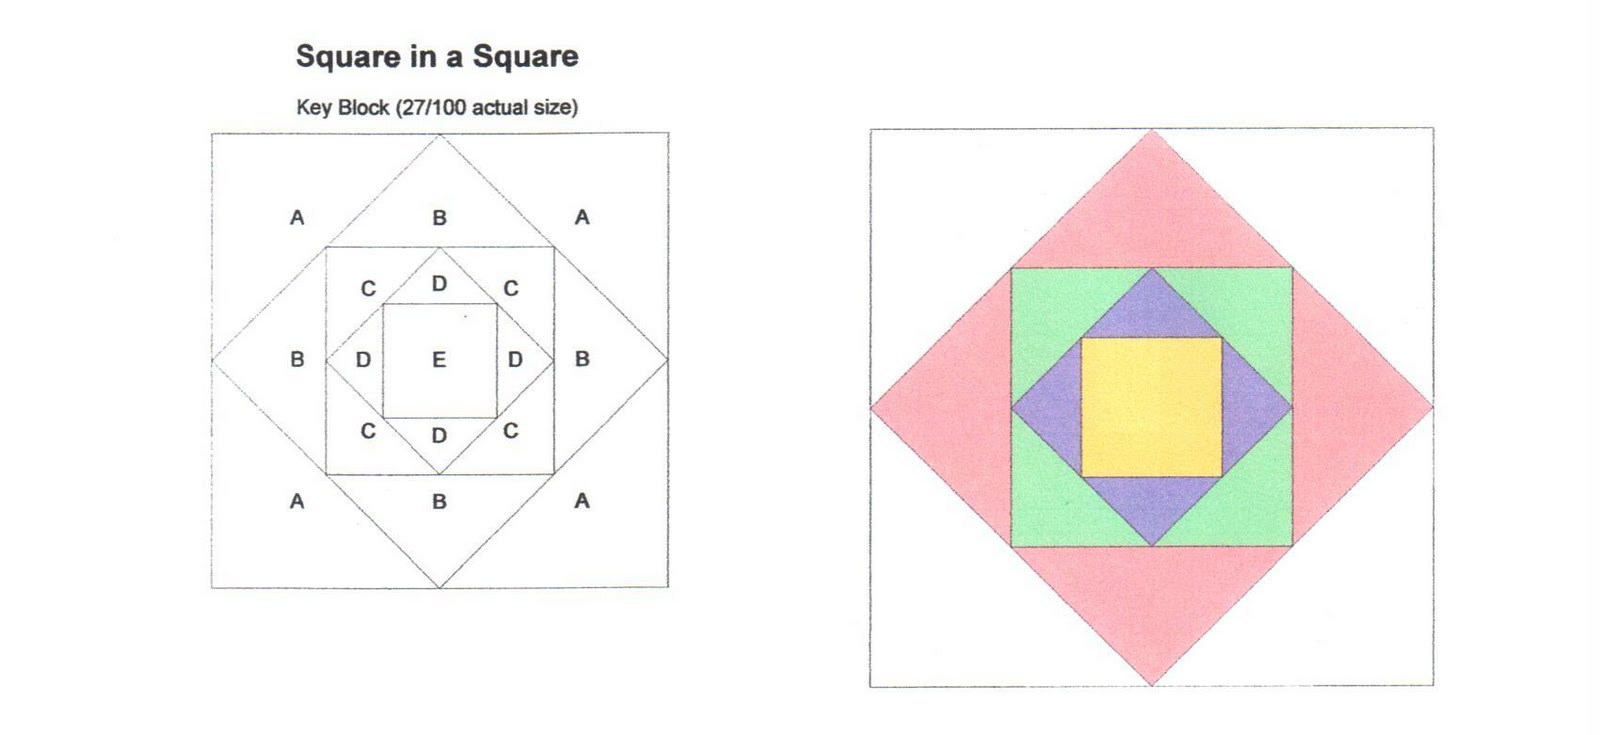
#19 Square in a Square
E Yellow Center
D Purple 1 – 3 1/2 square (cut twice diagonally)
C Green 2 – 3 1/8 squares (cut once diagonally)
B Pink 1 – 5 3/4 square (cut twice diagonally)
A Background 2 – 5 1/2 squares (cut once diagonally)
Find centers on all long edges of triangles. Place centers of E and D right sides together. Sew, and press towards triangle. Now repeat on opposite side. Continue until all 4 sides are finished. Repeat with C, B, and A. Finished block is 9 1/2" square.
As you sew each ‘square’ on, blocks should measure the following:
D - 3 5/8 C - 4 7/8 B - 6 7/8 A - 9 1/2

#21 Indian Hatches
Background B 4 – 3 1/2 squares
Color A 8 – 2 7/8 squares
Draw a diagonal line of the back of each A square. Place A and B right sides together matching two sides and a corner. Sew directly on the diagonal line. Press to set threads. Cut off two bottom layers. Press towards color (A). Repeat on opposite corner. Make sure you still have a 3 1/2 square. When all four squares are done, lay them out like a 4 patch. Sew together. Block should measure 6 1/2 inches.
Block of the Month: July

#11 LeMoyne Uneven Nine Patch
Background A 4 - 2 1/4 x 3
Fabric 1 (center) B 1 – 3 square
Fabric 2 (corners) C 4 – 2 1/4 squares
Begin by laying all of your pieces out to look like a 9 patch. Sew your 3 rows together, pressing towards the dark fabric within each row. Sew rows together, press away from the center row. Block should measure 6 1/2” square.

#14 Shoo Fly
Background:
AA 2 – 2 7/8 HST
B 4 – 2 1/2 squares
Color:
AA 2 – 2 7/8 squares HST
BB 1 – 2 1/2 square center
Start by making the four HST (Half Square Triangles) using the 2 7/8 squares from each fabric. Square up these HST to 2 1/2. Press to the darker fabric.
Next, lay pieces out like a 9 patch. Sew together into 3 rows. Press towards background fabric for less bulk. Sew rows together, press towards center row. Block should measure 6 1/2" square.

#15 Paper Pieced Heart
A document on how to paper piece has been sent to all the Block of the Month followers. If you need the directions on how to paper piece please leave a comment with your email address. If you're not interested in paper piecing sew any quilt block you like, it should just square up to 6 inches.

#22 Square and a Half
Background:
AA 2 – 3 7/8 squares HST
B 4 – 3 1/2 x 9 1/2
Color 1 (dark):
AA 2 – 3 7/8 squares HST
A 8 – 3 1/2 squares flip corners
D 1 – 4 1/2 square QST
Color 2 (med):
C 4 – 3 1/2 squares
D 1 – 4 1/2 square QST
Color 3 (light):
C 1 – 3 1/2 square center
D 2 – 4 1/2 squares QST
Begin by making the four AA, HST corners. Square up to 3 1/2, press towards the dark. Next, draw diagonal lines on the back of each 3 1/2, dark fabric. Sew these directly on the line to piece B using the block above as a guide for direction.
Next, QST, sew one of each Color #3 to Color #1 and Color #2. Sew like you are making a HST. Cut on line and press towards the dark. Do not square up yet. Now take one dark unit and place it with one medium unit. Draw a diagonal line, sew on both sides of line. Cut on line. Now you can square up to 3 1/2.
Friday, July 15, 2011
Block of the Month: June
So sorry that we got behind on the Block of the Month for June! Emails have been sent out with the PDF files, if you are already on the monthly email list and did not receive the email let us know. July's blocks should be posted at the end of the month. Send in pictures of your finished blocks. We'd love to see them!![]()
![]()
![]()

#9 New Album
Background:
A 4 – 2 1/4 squares
C 2 – 3 1/2 squares (cut diagonally once)
Color 1:
B 4 – 2 1/4 x 5 7/8
Color 2:
D 1 – 4 3/8 square
Begin by laying out all the pieces.
Find the center of each side of D and the long edges of C by folding each piece right sides together and finger pressing the center. Match these ‘centers’ together, sewing opposites sides first, and then press towards triangle. Sew remaining two sides, press towards triangle. Block center should now measure 5 1/2”.
Sew corner squares A with sides B for top and bottom rows. Sew remaining B pieces to each side of block center. Press within each row towards the B pieces. Connect the rows together by pressing away from the center. Block should measure 9 1/2” square.

#12 Old Maid’s Puzzle
Background:
AA 3 – 3 1/8 squares
B 4 – 2 3/4 squares
A 2 – 3 1/8 squares (cut diagonally once)
Color 1:
AA 3 – 3 1/8 squares
Color 2:
C 1 – 5 3/8 square (cut diagonally once)
Begin by making 6 half square triangles using all of the AA pieces. Square these up to 2 3/4 inch unfinished. Press towards the darker fabric. Now lay these with all of the other pieces to resemble the finished block above.
Continue to sew the block in sections. Starting with the two ‘4-patches’ using 4 of the half square triangles and the B squares. These sections should measure 5”.
Sew short side of A with remaining two AA. Press towards A. Sew another A to adjacent edge. Press towards A. Double check placement of A’s with block above. Now place this unit with C and sew along the long edge. Press towards C. Make two sets of this unit. Unit should measure 5”.
Lay the four units out like a 4-patch and sew together. Block should measure 9 1/2”.

#16 Swamp Angel
Background:
AA 2 – 7/8 squares
B 2 – 4 1/2 squares
C 1 – 3 1/2 square
Color 1:
AA 2 – 3 7/8 squares
Color 2:
B 2 – 4 1/2 squares
Begin by making 4 half square triangles using all of the AA pieces. Square up to 3 1/2”. Press towards the darker fabric. Lay these out with center to start forming the block.
Quarter Square Triangles: Using all B pieces, draw line diagonally on wrong side of the two background pieces. Sew background/color 2 together as if you are making half square triangles. Cut on drawn line and press towards the darker fabric. Now place these two ‘halves’ right sides together so Color 2 fabrics are opposite from one another. Draw line diagonally crossing both fabrics. Sew on both sides of drawn line. Cut on line, press, and square up quarter square triangles to 3 1/2”.
Lay units out to resemble a 9-patch. Sew together into 3 rows. Press away from the quarter square triangle within each row. Connect rows together. Block should measure 9 1/2”.
Wednesday, July 6, 2011
Chenille Truck Baby Blanket
If you know me at all you know I love to make baby blankets. Do you remember these? It is so fun to design them, pick out the fabrics, then give them to that adorable little baby. My friend just had a cute little boy so I just had to make another. So far I haven't made the same style of blanket twice but I loved this quilt so much that, that might change.
![]()
![]()
![]()
![]()
![]()
![]()
![]()

I used this Heirloom Cut Chenille Blanket Tutorial. I followed her tutorial for the most part. I didn't round the corners, and I added an extra layer right on top of the backing to make it sturdier since my fabric wasn't as thick. I also added a few patches to the front to give it a little more character.

I added the patches after I cut the top layers. It was a little harder to sew them on with it cut but in the end it is better. I just pinned them down really well so the cut strips underneath stayed flat. Then I sewed around the outside of the patch with a straight stitch, I left a small border so it would fray along with the rest of the quilt.

This is after one wash. The whole quilt will fray a lot more over time. I love how the patches frayed and how cute they look. They really add a lot to the quilt.

Here is the fabric I used for the backing. Don't you LOVE it?

This quilt was a lot of fun. It took longer than I expected. You definitely need to think of this as 'quilting', it isn't instant gratification sewing. I do have to say that it was faster than piecing and quilting though.


Subscribe to:
Posts (Atom)